Fences - Make your desktop more attract

0 comments

कम्प्युटरको Desktop भरिएर हैरान हुनु भएको छ ? नचाहदा नचाहदै पनि आफ्नो Desktop मा कुनै प्रोग्रामको Shortcut वा प्रोग्रामहरुको लिन्क वा फाइल फोल्डरहरु राख्नै पर्ने बाध्यताको सामना गर्नु परेको छ ?
सकेसम्म सबैले आफ्नो कम्प्युटरको Desktop सफा तर आफुले चाहेको प्रोग्राम अनी फोल्डरहरुको Shortcut लिन्क सजिलै उपलब्ध होस् भन्ने नै चाहन्छन । तर यस्तै लिन्क अनी Shortcut हरुले गर्दा नै Desktop भरिएको हुन्छन र फोहर देखिने कुरा सामान्य नै हो । तर के यिनै Desktop को समस्या समाधान गर्ने कुनै Software को महसुस गर्नु भएको छ ?
अबस्य पनि सबैले चाहेको यो समस्या समाधानको लागि एउटा फ्री मा उपलब्ध यस्तो Software छ जसको मद्त बाट तपाईंले आफ्नो कम्प्युटरको Desktop सफा अनी आफुले चाहेको प्रोग्रामहरु , फाइलहरु अनी महत्वपूर्ण Shortcut हरु Mannage गरेर राख्न सक्नु हुनेछ । यहाँ अहिले यस्तै एउटा Software को बारे चर्चा गर्न लागिएको छ ।
Fanecs एउटा यस्तै समस्या समाधानको लागि बनेको Software हो जुन तपाईंले फ्री मा प्रयोग गर्न सक्नु हुन्छ । 9.03 mb मा उपलब्ध यो Software को मद्तले तपाईंले आफ्नो Desktop लाई राम्ररी Manage गर्न सक्नु हुनेछ । यो Software मा उपलब्ध Option हरु बाट तपाईंले आफ्नो Desktop लाई अझ धेरै राम्रो र सुबिधाजनक बनाउन सक्नु हुनेछ ।
सोच्नुहोस् तपाईं सँग धेरै Desktop Icon हरु छन , जुन तपाईंको लागि महत्वपूर्ण नै छन । यि Icon हरु हटाएमा तपाईंलाई आफ्नो चाहिने प्रोग्रामहरु सम्म पुग्न धेरै सर्च गर्नु पर्ने हुन्छ । यो Software को मद्त बाट तपाईंले यि सबै Icon हरुलाई सजिलै Mannage गर्न सक्नु हुनेछ र एक क्लिक बाट सबै Hide पनि गर्न सक्नु हुनेछ । आफुलाई चाहिने Icon , फोल्डर अनी प्रोग्रामहरुलाई आफुले चाहेको Box मा आफ्नो नाम दिएर समेटेर राखी आफ्नो Desktop बाट लुकाइ राख्न र आफ्नो माउसको Double क्लिक बाट Show गर्न सक्नु हुनेछ ।
Software को महत्वपूर्ण पक्ष :
@ Icon हरुलाई Categories अनुसार छुट्याएर राक्न सकिने
@ जती धेरै Icon हरु भए पनि Categories छुट्याएर राखे पछि Desktop सफा देखिने
@ सबै Icon हरुलाई सजिलै Double क्लिक बाट Hide गर्न सकिने
@ आफुले चाहेको जती Fences Creat गर्न सकिने
@ Creat गरेको Fancec हरुलाई आफुले चाहेको Size मा Drag गरेर मिलाउन सकिने
Software डाउनलोड गर्नको लागि यहाँ क्लिक गर्नुहोला

Read More »

Connect two Laptops using WIFI

0 comments
WiPeer
The Freedom to Share – No Strings Attached


What is WiPeer ?

WiPeer enables sharing files directly among computers, playing multi-player games, chatting, and collaboration over both Wi-Fi and home/office networks. The new Peersonalizer feature of WiPeer allows you to discover whenever your facebook friends, or the friends of your friends, are nearby.

Who needs WiPeer ?

- You are visiting your friends and would like to transfer photos of a shared trip from your laptop to theirs. Wouldn't it be great if you could share your files with them directly from one computer to the other?
- You are sitting in a boring lecture. You and your friends all have laptops, but your university has not installed an access point in the lecture room. Wouldn't it be great if you could play a game of Chess or Reversi against them, or even gossip with them about yesterday's football match?
- You are stuck in an airplane for a long flight and you are looking for something to do. If you could only play a game of Chinese checkers with other passengers...
- You have a home network, or even a small office network, and you'd like to share files among your computers without having to set up a dedicated server. There has to be a simple way of doing this.
- You are new in campus and want to make friends quickly. If you have a facebook account, the Peersonalizer feature of WiPeer can help you with that.

NEW: WiPeer is now also available in Spanish, French, Portuguese, Russian, Italian, Croatian, Macedonian, and Turkish!
To Download Software Click Here

Read More »

Internet Radio Player And Recorder (Free Version)

0 comments

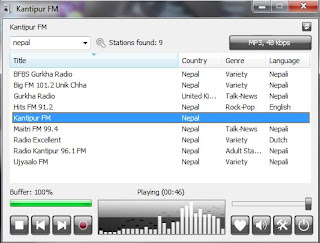
Radio? Sure! (Free Version) is an Internet radio player and recorder that comes preloaded with more than 12000 free online radio stations from all around the world. You can search the list by keyword, sort it by country, genre or language and maintain a list of your personal favorites for quick access. The program also allows you to record the radio stream you are listening to and can automatically split the recording into individual mp3 files - one for each track. Other features include the option to add your own stations, support for multiple stream sources, automatic crossfading for smooth transitions when switching stations, command line parameters and keyboard hotkeys

“RadioSure” gives you the smoothest radio listening experience. The main rule is – it should be simple, reliable and should just work.


Main features are:

More than 17000 of stations in the package
Supports most of the internet radio formats – mp3, wma, ogg vorbis, aac+ and so on
Quick and reliable search for your favorite radio stations
Smooth switching between stations including crossfade effect
Recording what you are listening to and packaging it into separate song files
Simultaneous recording of multiple stations
Automatic checking for software and radio stations updates
Command line parameters for automatization
Runs on Windows XP SP3, Vista, Windows 7 (32 and 64 bit)
UNICODE support – all domestic stations are perfectly visible and searchable
and much much more…

Don’t you still want to try?
Just download and enjoy it!

Read More »

Complete Internet Repair

0 comments


यदि तपाईंले गल्तीले आफ्नो कम्प्युटरको Internet को settings चलाऊनु भएको छ वा कुनै virus को कारण setting बिग्रेर समस्या भोगी रहनु भएको छ भने यो tool ले तपाईंलाई मद्त गर्न सक्छ ।
Complete Internet Repair नामको यो Tool आफ्नो नाम अनुसार नै तपाईंको कम्प्युटरको Internet सँग सम्बन्धित लगभग सबै समस्याहरुको समाधान गर्नको लागि उपयोगी छ । यसमा तपाईंले धेरै बिकल्प (option) हरु पाउनु हुनेछ र आफ्नो इच्छा अनुसार बिकल्पहरु छानेर वा सबै बिकल्प एकैचोटी छानेर आफ्नो windows को मुल internet Setting प्राप्त गर्न सक्नु हुनेछ ।

It could help if you are experiencing any of the following problems:
@ Internet or network problem after removing adware, spyware, virus, worm, Trojan horse, etc.
@ Loss network connection after installing/uninstalling adware, spyware, antispam, vpn, firewall or other networking programs.
@ Unable to access any webpage or can only access some webpages.
@ Pop-up error window with network related problem description.
@ No network connectivity due to registry errors.
@ DNS lookup problem.
@ Fail to renew the network adapter’s IP address or other DHCP errors.
@ Network connectivity issue with limited or no connections message.
@ Windows update does not work
@ You are having problems connecting to secured websites (ex. Banking).
@ Internet Explorer stopped working or crashes all the time.
@ Other networking problems.

जम्मा 438 KB को Complete Internet Repair एकदम सजिलो Utility हो । यसलाई तपाईंले कम्प्युटरमा Install गरिराक्नु पर्ने जरुरी पर्दैन । बस यसलाई Unzip गर्नुहोस् र ClntRep.exe नामको फाइल Run गरिदिनुहोस् ।
Version: 1.2.8.1280
Release Date: August 5th 2011
System Requirements: Windows XP, Windows 2003, Windows Vista, Windows 7
Disk Space: 1 MB

Read More »

Free मा कम्प्युटरमा टि।भी च्यानल हेर्ने कि ?

0 comments


ईन्टरनेट संसारमा अनलाइन टि.भी च्यानल हेर्ने थुप्रै Software का साथसाथै साईटहरु पनि पाईन्छन । कुनै फ्री हुन्छ त कुनैको लागि पैसा तिर्नु पर्ने हुन्छ । यहाँ यस्तै फ्रीमा उपयोग गर्न पाइने एउटा software को बारे चर्चा गरिदैछ । "Readon TV Movie Radio Player" एउटा यस्तो फ्री Software हो जसको मद्तले तपाईंले संसार भरिका चुनिएका टि.भी प्रोग्रामहरु हेर्न र एफ.एम स्टेसनहरु सुन्न सक्नु हुनेछ । हुन त नेपालको सन्दर्भमा यो software त्यती उपयोगी नहोला किनकी यसको लागि उच्च गतीको ईन्टरनेट Connection को जरुरत पर्दछ तर जहाँ उच्च गतिको ईन्टरनेट Connection छ त्यहा यसमा उपलब्ध टि.भी च्यानलहरु बिना रुकावत मज्जाले हेर्न सकिन्छ ।
यसमा बिभिन्न देशका साथसाथै छिमेकी देश भारतका केही चर्चित टि.भी च्यानलहरु हेर्न सकिन्छ , नेपालका च्यानलको कुरा गर्नेहो भने यसमा अहिले सम्म ३ वोटा च्यानल मात्र add भएका छन जसमा सगरमाथा टि.भी, एन टि.भी र एन टि.भी प्लस । यो software को अरु खास बिशेषता भनेको यसमा टि.भी च्यानल तथा एफ.एम स्टेसन हेर्न र सुन्न मात्र हैन Record पनि गर्न सकिन्छ र यसका साथसाथै यसबाट Video Converter, Record Audio from pc, Rip Audio CD जस्ता काम पनि गर्न सकिन्छ । तपाईंहरु पनि एक चोटि यो Software Download गरी प्रयोग गरी किन नहेर्ने त ?

Software download को लागि यहाँ क्लिक गर्नुहोला

यो प्रोग्राम चलाऊनको लागि तपाईंको कम्प्युटरमा Dot Net Framework 3.5 वा त्यो भन्दा माथिको भर्सन Install हुनु जरुरी छ ।


Read More »

How to disable/enable USB Port in Windows 7 ?

0 comments
तपाईं आफ्नो कम्प्युटर अथवा ल्यापटपको USB Port लाई सुरक्षित गर्न सक्नु हुन्छ ताकि कोही अरु ब्यक्तीले तपाईंको अनुपस्थितीमा कम्प्युटर बाट PenDrive वा अन्य कुनै डिभाइसले USB Port को माध्यम बाट तपाईंको महत्वपूर्ण Data हरु चोरी गरेर नलगोस । तपाईंले आफ्नो कम्प्युटरको Registry Editor बाट तल उल्लेखित प्रकृया द्वारा सजिलै यो Port लाई enable/Disable गर्न सक्नु हुनेछ । त्यसो त बिभिन्न कम्पनीहरुले आफ्नो कम्प्युटरको यो Port पहिले नै disable गरेर राखेका हुन्छन कारण माथि भनिए जस्तै आफ्नो महत्वपूर्ण Data हरु चोरी नहोस् भनेर, तपाईंले अब यो Trick को प्रयोग गरेर त्यसरी disable गरेर राखेका कम्प्युटरहरुमा यो port लाई enable गरी आफ्नो काम गर्न सक्नु हुन्छ ।

Registry Editor द्वारा USB Port लाई Enable/Disable गर्ने तरिका :
@ windows 7 मा keyboard मा windows key+R थिच्नुहोस् र त्यहा regedit टाईप गर्नुहोस् ।


@ अब windows 7 को Registry Editor खुल्नेछ ।


@ Registry Editor खुलिसकेपछि त्यहा यो location सम्म जानुहोस्
HKEY_LOCAL_MACHINE\SYSTEM\CurrentControlSet\Services\USBSTOR
@ दाँया तिरको Start मा राईट क्लिक गर्नुहोस् र modify मा जानुहोस् ।


@ USB Port लाई Enable गर्न value लाई 3 राख्नुहोस् ।
@ USB Port लाई Disable गर्न value लाई ४ राख्नुहोस् ।


कम्प्युटरको Registry Editor चलाऊदा एकदम ध्यान दिनु जरुरी छ । यदि तपाईंलाई कम्प्युटर बारे त्यती जानकारी छैन भने सके सम्म यो part लाई नचाउनु नै जाती हुन्छ ।
यदि तपाईंलाई Registry Editor सम्बन्धी त्यती जानकारी छैन भने यो software को प्रयोग गरेर पनि यो काम गर्न सक्नु हुनेछ ।
software downlaod गर्न यहाँ क्लिक गर्नुहोला

Read More »

ल्यापटपको ब्याट्री तथा बिजुलीको खपत सम्बन्धी समस्या ठीक गर्ने उपाय

0 comments


ल्यापटप तथा नोटबुक उपयोग गर्नेहरुको वास्तविक समस्या अनी चिन्ता भनेको ब्याट्रीको ब्याकअप पावर कमजोर हुनु नै हो । ल्यापटपको ब्याट्रीको अधिकांश निर्माता कम्पनी द्वारा दिईेएको अबधि भन्दा अगाडिनै त्यसमा समस्या आउन थाल्ने कुरा सामान्य जस्तै हो, तर वास्तवमा ति निर्माताहरु यो बिफलताको लागि जिम्मेदार छैनन किनभने एउटै कम्पनीको ब्याट्री कुनै ल्यापटपमा राम्रै सँग चलीराखेका हुन्छन । यहाँ निर बुझ्नु पर्ने कुरा के हो भने ब्याट्रीको BackUp Power कमजोर हुनुमा ल्यापटपको Setting ( timeout and sleep settings, display settings, and screensavers) आदिमा नै भर पर्ने कुरा हो ।
अब यहाँ कुरा आयो ब्याट्रीको लाईफ बढाउन कसरी setting मिलाउने भन्ने कुरा,

किनकी धेरैलाई आफ्नो ल्यापटपका यि setting हरु कसरी कुन option मा राख्दा ठीक हुन्छ थाहा हुँदैन । यही भ्रमलाई ठीक गर्न Microsoft ले Windows प्रयोगकर्ताहरुको लागि "Fix it" प्रोग्राम provide गरेको छ जुन तपाईंले Microsoft Support website बाट Download गर्न सक्नु हुन्छ । यो Tool चलाएर तपाईंले आफ्नो ल्यापटपको ब्याट्री BackUp लाईफलाई बढाउन सक्नु हुनेछ । यो Tool ले Windows 7 अपरेटिङग सिस्टम मा धेरै राम्रो काम गर्ने भए पनि अरु सिस्टम Vista, Xp मा पनि काम गर्छ ।


जुन ल्यापटपको setting मिलाउनु पर्ने हो त्यही ल्यापटपमा यो साईट खोल्नुहोस्
MicrosoftFixit.power.Run.exe here
र त्यहा Run now बक्समा क्लिक गर्नुहोस् ।

"Fix it" Tool ले fix गर्ने कामहरु
*Period of time before the computer goes to sleep is set too long
*Screen saver is used instead of setting the computer to enter sleep mode
*Display brightness is set too high
*Power plan is not set to the most efficient power plan
*Wireless adaptor in not optimized for power saving
*Minimum processor state is set too high

Read More »

Facebook shortcut keys for Mozilla Firefox and Internet explorer

0 comments
फेसबुक आजभोलि सबैको प्यारो बनेको छ । दिनमा एकपटक फेसबुक खोली status अपडेट नगरि, साथीहरुको Status नहेरी अथवा कमेन्ट नगरि त चित नबुझ्ने भईसक्यो । धेरैलाई थाहा नहुन सक्छ कि फेसबुक चलाऊदा पनि बिभिन्न shortcut key हरु प्रयोग गरेर अझ सजिलै यो चलाऊन सकिन्छ भन्ने कुरा । आज यहाँ फेसबुक चलाऊदा खेरी प्रयोग गर्न सकिने shortcut keys को बारे केही जानकारी राख्न गईरहेको छु । लौ अब तपाईंहरु पनि माउसको प्रयोग बिना नै फेसबुक चलाऊने हैन त ?

Shift+Alt+0 : facebook help center

Shift+Alt+1 : facebook homepage

Shift+Alt+2 : your facebook profile page

Shift+Alt+3 : friend request

Shift+Alt+4 : messages

Shift+Alt+5 : notification

Shift+Alt+6 : account page

Shift+Alt+7 : privacy setting

Shift+Alt+8 : facebook's page on facebook

Shift+Alt+9 : facebook terms of use

Shift+Alt+? : enable search

Shift+Alt+m : compose a new message

Enjoy Facebook !!!

Read More »

Window 7 मा Password Reset Disk बनाउने तरिका

0 comments
Windows 7 मा Password Reset Disk बनाएर राख्नु हरेकको लागि एकदमै लाभदायक हुन सक्छ किनकी यदि तपाईंले आफ्नो कम्प्युटरको Logon Administrator Password बिर्सिनु भयो भने यो Password Reset Disk को सहायताले सजिलै आफ्नो कम्प्युटरको Password Reset (परिवर्तन) गर्न सकिन्छ । एकचोटी तपाईंले आफ्नो कम्प्युटरको Password Reset Disk बनाएर सुरक्षित राख्नु भयो भने Password बिर्सिएर हुने टेन्सन बाट सधैंलाई मुक्ती पाउनु हुनेछ ।
तपाईंले आफ्नो कम्प्युटरको password Reset Disk बनाउनु भएको छैन र Password बिर्सिनु भयो भने कम्प्युटर logon गर्न धेरै गार्हो पर्छ र अन्तिम बिकल्प कम्प्युटरलाई फरम्याट गर्नु नै रहन्छ । कम्प्युटर फरम्याट गर्नु भनेको तपाईंको कम्प्युटरमा भएका सबै महत्वपूर्ण Data loss गर्नु हो । त्यसैले पछि पछुताउनु भन्दा बेलैमा किन Password Reset Disk बनाइ नराख्ने ???
Password Reset Disk बनाउन तपाईंलाई एउटा pendrive को जरुरत पर्दछ, तपाईंले CD,DVD वा external HardDrive मा Password Reset Disk बनाउन सक्नुहुन्न ।

Password Reset Disk बनाउने तरिका
०) सर्वप्रथम कम्प्युटरमा USB पोर्टमा Pendrive राख्नुहोस् जसमा तपाईंले Password Reset Disk को फाइल save गरेर राख्दै हुनुहुदैछ ।
१) Start बटन मा क्लिक गर्नुहोस् र control Pannel लाई छान्नुहोस् ।
२) त्यहा User Accounts and Family Safety लिन्क मा क्लिक गर्नुहोस् ।

(यदि Control Pannel मा View by: Large icons वा Small icons राखिएको छ भने तपाईंले यो लिन्क देख्नु हुन्न, User Accounts and Family Safety लिन्क देख्नु भएन भने सिधै User Accounts लिन्कमा जानुहोस् ।)
३) User Accounts लिन्क मा क्लिक गर्नुहोस् ।

४) अब बाँया तिरको Task pane मा हेर्नुहोस् त्यहा भएको Create a password reset disk लिन्कमा क्लिक गर्नुहोस् ।
( यो लिन्कमा क्लिक गर्दा तपाईंले "No Drive" Warning मेसेज पाउनु भयो भने तपाईंको कम्प्युटरमा usb PenDrive connection भएको छैन भन्ने जान्नुहोस् र PenDrive Connection चेक गर्नुहोस् । )

५) जब Forgotten Password Wizard विन्डो देखा पर्छ त्यसपछि Next बटन क्लिक गर्नुहोस् ।

६) create a password key disk in the following drive: drop down बक्स मा आफ्नो PenDrive लाई छान्नुहोस् र Next बटनमा क्लिक गर्नुहोस् ।

७) अबको window मा तपाईंको Current Account Password भर्नुहोस् र Next मा क्लिक गर्नुहोस् ।

८) अब केही बेरमा Progress 100% complete भई सकेपछि फेरी Next बटन क्लिक गर्नुहोस् र खुलेको अर्को window को Finish बटनमा क्लिक गर्नुहोस् ।


९) तपाईंको Password Reset Disk तयार भयो । अब तपाईंले उक्त pendrive खोलेर हेर्नु भयो भने त्यहा "UserKey.PSW" नामको एउटा फाइल देख्नु हुनेछ । यो फाइल नै तपाईंको कम्प्युटरको password reset गर्दा प्रयोग गर्ने फाइल हो । त्यसैले आफ्नो यो pendrive लाई सुरक्षित त राख्नुहोस् नै साथसाथै pendrive भित्रको यो फाइललाई पनि सुरक्षित राख्न नबिर्सिनुहोला ।


Note:
तपाईंले आफ्नो कम्प्युटरमा एक भन्दा धेरै पल्ट यो disk को सहायताले Password परिवर्तन गर्न सक्नु हुन्छ, यसको मतलब तपाईं बाहेक अरु कसैले पनि यो drive को मद्दतले उक्त कम्प्युटरको Password परिवर्तन गर्न सक्छन । यो कुरा ध्यानमा राख्नुहोला ।

Read More »

Windows 7 मा Hard Drive लाई फरम्याट नगरि कसरी Partition गर्ने ?

0 comments
टेक्निकल दुनियाँमा नयाँ नयाँ अपरेटिङग सिस्टमको आगमन सँगै पुरानाको तुलनामा अझ धेरै सुबिधाहरु थपिएर आएका छन । हालै चलन चल्तीमा रहेको अपरेटिङग सिस्टम Windows 7 तथा Vista मा Disk Partition सजिलै गर्न सकिन्छ । पुराना अपरेटिङग सिस्टममा एक चोटि Partition गरिसकेको Hard Drive लाई फेरी partition गर्नु परेमा Format नै गर्नु पर्ने समस्या हालका अपरेटिङग सिस्टममा छैन । यहाँ चर्चा गर्न लागिएको सिस्टम windows 7 मा तपाईंले सजिलै कम्प्युटर फरम्याट नगरीकनै आफ्नो hard drive लाई Partition गर्न सक्नु हुनेछ । Disk management मा उपलब्ध Shrinking र expanding utility प्रोग्रामको सहायताले तपाईंले Partition मात्र हैन drive डिलिट तथा re-size पनि गर्न सक्नु हुनेछ ।
अब यहाँ Hard Drive लाई कसरी partition गर्ने भन्ने बारे Step by Step चर्चा गरौ :

१) सर्वप्रथम "start" बटनमा क्लिक गरौ, त्यहा देखिएको "Computer" मा राईट क्लिक गरौ र "manage" option मा जाऔ ।

२) "Computer Management" नामको नयाँ window खुल्नेछ, त्यहा "Storage" मा क्लिक गरौ र "Disk Management" मा जाऔ ।

३) "Disk Management" मा गईसकेपछि तपाईंले आफ्नो कम्प्युटरमा भएको Drive हरु देख् न सक्नुहुनेछ ।

४) अब तपाईंले कुन drive लाई partition गर्न खोज्नु भएको हो त्यो "Drive" लाई राईट क्लिक गर्नुहोस् र "Shrink Volume" option लाई छान्नुहोस् ।

५) नयाँ window खुल्नेछ जसमा उक्त Drive को Size, Partition को लागि उपलब्ध space र नयाँ partition मा कति amount को space भएको Drive बनाउने भन्ने option हुनेछ । त्यहा तपाईंले नयाँ Partition गर्दा बन्ने drive कती space को बनाउने हो त्यो Value भर्नु पर्नेछ । याद राख्नुहोस् त्यहा Size of available shrink space मा देखिएको भन्दा बढी Space Value त्यहा राख्न पाउनु हुन्न ।


६) Value राखीसकेपछि Shrink बटन क्लिक गर्नुहोस् र procress सकिन केही समय पर्खिनुहोस् । operation सकिएपछि त्यहा तपाईंले unallocates space र तपाईंले अघि राख्न नु भएको exactly value भएको खाली drive देख् नु हुनेछ । अब त्यो unallocated space लेखिएको drive लाई सेलेक्ट गर्नुहोस् र राईट क्लिक गरेर "New Sample Volume" option मा जानुहोस् ।

७) त्यहा नयाँ बन्ने Volume को लेटर कुन राख् ने छान्नुहोस् र next बटन क्लिक गर्नुहोस् ।
८) अब Format पेज देखिनेछ यहाँ निर ध्यान दिनुहोस् कि File System NTFS सेलेक्ट गर्नुहोस् र Volume Label मा उक्त volume को नाम कुन राख् ने हो लेख्नुहोस् ।


९) Next बटन क्लिक गर्नुहोस् र अन्तिममा Finish गर्नुहोस् ।

Read More »