Snakes are one of the most-drawn animals, if not the most drawn animal. They're considered to be very simple, with no legs or special muscles that need to be defined. There's only a head (without ears!) and a long tail—what can go wrong?
So, welcome to the perfect start into the world of animal drawing: a guide to drawing snakes! I'll show you how to draw both venomous and harmless snakes, and how to draw their scales and patterns realistically. We won't focus only on one species, but rather will look at the techniques you need to draw any part of any type of snake. Aafter going through this tutorial, you should be able to draw most varieties of snakes almost effortlessly.
1. Snake Bodies
Basic Anatomy
Let's start with some basics about snakes' anatomy. We tend to see think of snakes as made mostly of a long tail, but the truth is, the majority of a snake's body is actually a long chest.

The outwardly harmless belief that a snake body is mostly made of a tail leads to entirely incorrect drawings of snakes. Even as one of the simplest animals, snake drawings still suffer from a too-cursory knowledge about their makeup. Instead of seeing them as a constantly tapered tail, it's better to imagine them as a string of beads—which confirms closer to the curved rib shape that actually makes up the snake's body. "Neck" beads are a bit narrower than "chest" ones", and then they get smaller and smaller, but not very rapidly. In contrast, if you think of a snake as just a long tail, you'll likely sharply taper its entire length.

The length and width of the "neck" and "chest" segments depend on the species. Some will have no neck at all, while others are so slender the chest will not be noticeable. If you're drawing a snake without focusing on the species, you can experiment here. Remember—snakes don't need to be always perfectly slender, and sometimes they look fat and clumsy!

The "string of beads" method is very useful in creating 3D poses. If you have problems with imagining the sides, you can use cubes instead of balls.

You can make the 3D very easy to draw by adding more circles between those building the pose. This way you'll get a sense of volume, and the sides will be easier to define.


What about snake's famous hoods, often seen in cobras? They're actually a snake's body, flattened by straightened ribs. That means the hood's width is dependent on the normal width of the body, and it can't be as wide as you may like it to be.

Movement Types
To create a believable pose, we need to know how snakes move.
1. Serpentine movement - the classic movement of a snake. The animal use its strong body to push on terrain crimps (or just uses the terrain as a whole, if it's rough enough to create resistance).

2. Concertina movement - the movement where the snake folds and expands regularly, like a concertina or accordion. Snakes use this method when climbing or coming through narrow tunnels.

3. Caterpillar movement - this movement works similarly to a vertical concertina movement. Slight horizontal concertina may occur as well during this movement.

4. Sidewinging movement - this method is very efficient on slippery or hot surfaces (like desert). The snake pushes itself with a swaying motion of the raised coils, which makes it move somewhat sideways.

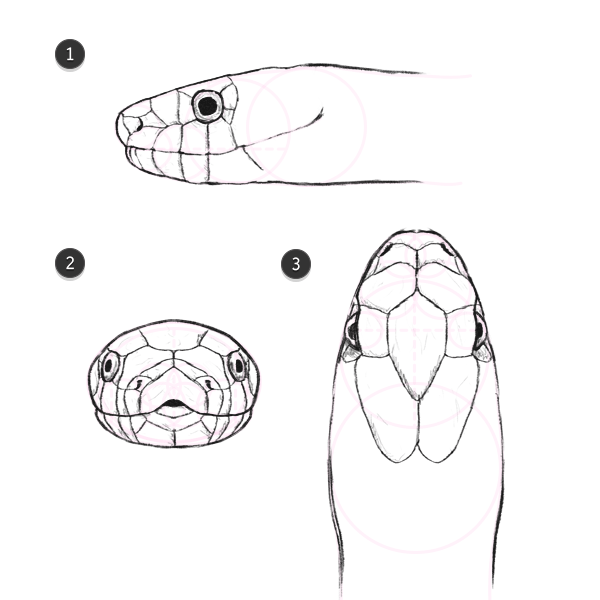
2. How to Draw a Snake's Head
Shape
Step 1
I'm going to show you three views of the snake's head at the same time: side (1), front(2) and top (3). This way, you'll be able to easily compare them to understand this form in 3D.
Start with a flattened ball. In addition to the center line, there should also be a line placed at one third of the diameter.

Step 2
We next need to define the jaws and cheeks. The arrows in the diagram below show you the flow of this shape.

Step 3
Add another, bigger ball behind the main one. This way, we'll elongate the skull properly.

How much larger should this second ball be? Generally, venomous snakes have more triangular heads, with a clear neck endpoint, so you'll want a much larger second ball. Nonvenomous snakes typically have narrower heads so the second ball only needs to be a bit wider.

Step 4
You can now easily outline the contours.

Step 5
The eyes are placed close to the narrower tip of the skull.

Step 6
Now, smile! The snake's smile—or mouth, rather—should be wide and well defined. Add small nose holes appropriately as well.

Step 7
With all the guide lines, you can easily sketch the rest contours. Don't forget about a small hole between the lips that lets the tongue slip out without opening the mouth!

Step 9
If you're adding a bottom view to your snake, use the top view circles to create the bottom one, and just forget about the eyes and nose.

Scales
If simply redrawing the scales at random doesn't satisfy you and you want to remember rules about their placement, here's a few tips. Keep in mind that not all snakes are the same, and their scales may vary as well. What I'm showing you is a general pattern, especially common for nonvenomous species.
Step 1
Let's start with the mainly vertical lines. There's one right under the eye, two on its sides, and three others near the nose. (Observe all the views to understand exactly what you're drawing, so you'll remember it more easily).


Step 2
Now, let's go horizontal. Draw a line from the nose to the eye, then split it into four new ones. The front of the head needs some little tweaks too.

Step 3
Now, back of the head. Right behind it regular scale rows begin.


Step 4
The bottom view of the head needs a different treatment:

Step 5
If you don't want to learn all these arrows by heart, here's a colorful scheme for you. Once again, keep in mind that every snake is different and you can modify these shapes accordingly.

Step 6
Venomous snakes (and some nonvenomous snakes—pythons, in particular, have them very distinctively) can have heat-sensitive pits on their heads. You can treat them as big nose-holes made of scales. You can find them somewhere next to the nose, and in a row on the upper or lower lip (not necessarily everywhere at the same time, as shown below). They let the snake see the temperature (infrared light) to spot the warm body of its prey.
Venomous snakes have also smaller, tighter scales on their heads, similar to the ones on the rest of their body. They're easier to draw, since they're often quite chaotic. You can make the head less "smooth", with high nostrils and strong brows, to define the aggressive look of the snake.

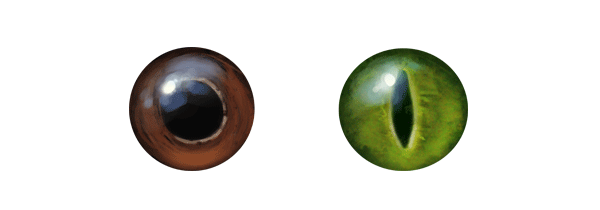
Eyes
Time for some details. Generally, venomous snakes have slit pupils, while nonvenomous snakes have round pupils. Their eyes themselves are round, but can look sharper thanks to a "brow" scale. Use it for an evil look!

Snake eyes come in unbelievably great set of colors. Basically anything you can imagine will look good on your made-up species, as long as you stick to the round shape and proper pupil.
Jaws
Snakes have the most interesting jaws construction of any animal (except perhaps for the moray eel). Let's start slowly. First, the fangs (if present) need to be curved to inside, so that the snake doesn't bite itself (snakes are not actually immune to their own venom!).

Secondly, there is a bone between the upper and lower jaw, loosely connected to both of them. It gives the jaws a tremendous range of motion. Snakes with long and strongly curved fangs (like vipers) may be able to "retract" them—bend the tip of the mouth to point them straighter.

But that's not all: each jaw is split in two (connected by an elastic ligament), and each can move independently. Now it's obvious how snakes can swallow prey much larger than their head!

Details
Let's take a good look at a close-up of the head:
- Fangs - sharp as needles, often covered with a thick gum. Only venomous snakes have those!
- Venom duct - venom runs from its gland right through a hollow fang. Then it can be transferred into the prey's body during a bite. Some species are able to spit the venom through the fangs.
- Glottis—a hole that's part of respiratory system. It lets the snake breath when it's swallowing, and is also able to create the hissing sound.
- Tongue—it's long, slim (but not flat) and shiny. A snake use it to "lick" the air, so it's used as an additional sense. To process the "taste", the tongue must touch a special organ inside the mouth, hence the slipping in and out. The tip is forked to create two independent tips, each receiving a slightly different signal from its side (just like two eyes). The pose shown below is impossible, since the tongue slips out of its sheath only when the mouth is closed.
- Cheeks—these strong muscles manage the movement of the jaws. Draw them as they deserve, thick and solid.

3. Scales and Patterns
Scales are where the simplicity of a snake ends. Now the brave artist must be patient and draw all the scales one by one, and then shade them the same way. No, I'm not going to show you some magic method to avoid the work—instead, I'll show you how not to waste this time by ending up with a flat pattern.
Scales' Structure
We already described and sketched the scale structure all around the head. Beyond that, quite regular and well-known scales occur in neat, orderly rows. The dorsal scales cover all the back and sides, while the remaining space is taken by ventral scales—wide, elongated plates covering all the belly, parallel along the body. They can be as wide as the body (covering whole belly's width) or narrower. If they're narrower, they may not be visible from the side.

Of course, there is a place where the belly ends and the tail starts. It's defined by the anal plate (colloquially speaking, a snake's butt). Here things go a bit different for a venomous (left) and nonvenomous (right) species:
- venomous snakes have a single anal plate, and the scales under the tail are placed just behind it
- nonvenomous snakes have the anal plate slipped, and then the other scales are divided too.

Drawing the scales themselves isn't very hard, and you have probably seen the mini-tutorial in the image below. Cross some lines, them draw the scales between them—we've all been there. The problem is, this trick gives us very flat laying scales, so we need to modify it.

Here's the steps you need to make your scales contour to the snake's body and appear more life-like.
Step 1
The trick is to bend the initial line a little, to an opposite direction at both halves. So, instead of drawing an oblique line, you just need to draw an elongated S (or integral symbol), and cross it with its mirrored reflection.


Step 2
The other lines need to copy the bending. Simply repeat that shallow curved line pattern along the snake's body.

Step 3
If you draw the scales on the mesh now, you'll see they get smaller when closer to the edge, which gives them the receding look that a 3D snake body should have. That's all!

However, this method becomes quite problematic when it comes to curves on the snake's body. Here's a workaround for this problem. It may look confusing at first, but try to draw it and you'll see how it works:
- Draw the guides with the usual method on the straight parts
- Draw a set of parallel lines between the pink line from A and blue line from B
- Do the same between the blue line from A and pink line from B
- If you did it correctly, the scales should now follow the curve. The tightening of lines inside the curve should now appear natural.

Texture
Generally, there's two distinct types of scales—smooth (1) and keeled (carinate, 2). Smooth scales are shiny (but not wet) and usually rounder than keeled ones, which have a rough look and are sharper.

There's a special kind of keeled scales, raised in a way that makes them look spiky.

Scales aren't connected to each other, but to the skin only. Therefore, when the skin is stretched (3—when swallowing a big prey or even when moving), the scales move away from each other. Some less slender snakes may have the scales placed tightly on the head and neck (1), and down their body a bit of distance between them occurs (2).

Patterns
Once you got the problem with scales sorted out, you can add colors to your snake. The variations of patterns are limitless! While most animals are dull colored for camouflage's sake, snakes proudly show their bodies to the world, announcing how dangerous they are—and that they're not worth messing with. You can finally use saturated, bright colors without going away from realism.
Here's the color patterns that work well.
Plain
This can be a base for a pattern or just a pattern on its own. Use any color you want for the whole body.

The variation of this pattern is to blend it softly with other colors. You can make the head darker, or the belly lighter, whatever you want.

Rings
Rings go around the body. They can be plain or multiply colored (stripes with borders).

Crossbands are a variation of rings. They go around the body too, but without crossing the belly.

Speckles
These are small patches of color on individual scales.

Stripes
They run along the length the body, straight and regularly.

Blotches
These can be very irregular, of various sizes, placed randomly across the body.

Almost every pattern allows a variation of contrasting borders to be added to it.

Diamond
These are diamond-shaped blotches, placed regularly, with contrasting borders.

That'sss All!
Today we've learned that snakes aren't as easy to draw as one may think. These beautiful animals, so often feared and hated by people, deserve some love! Take a break from drawing cute kittens and puppies, and draw a snake from time to time. Eating a puppy.
Good luck!
Read More »