Showing posts with label Internet. Show all posts

कसरी Right-Click Disabled गरिएका साईटहरुबाट इमेज कपि गर्ने

0 comments
तपाईंहरुले अनुभब गर्नु भएकै होला कुनै कुनै वेबसाईट वा ब्लगहरुमा "right-clcik" disable गरिएका हुन्छन । तर आजको दिनहरुमा यसरी JavaScript वा अरु कुनै कोडको प्रयोग गरेर यसरी "right-clcik" लाई Disable गर्नु भनेको मुर्ख्याई साबित भई सकेको छ । आजको दिनमा पनि केही वेबमास्टर वा ब्लगरहरुले यो method अपनाइराखेकै छन तर यसले फाईदा भन्दा पनि बढी बेफाईदा नै गरिराखेको हुन्छ । यदि तपाईं पनि यस्तै method अपनाउने मध्यमा पर्नु हुन्छ भने एक चोटि ध्यानदिएर यो पढ्नुहोस् त (Click Here)

यसरी वेबसाईटहरुमा "right-click" Disable गर्नुको प्रमुख कारण भनेको वेबसाईट visitor हरुले आफ्नो साईटको Artical वा Image चोरी गर्लान भनेर नै हो तर यो नै कारणलाई लिएर यदि तपाईंले पनि यो तरिका अपनाउनु भएको हो भने तपाईंलाई पनि मुर्खको क्याटगरीमा राख्दा केही फरक नपर्ला किनभने यसरी right-clcik protect गरिएका साईटहरु बाट इमेज कपि गर्न right-click गरेर बाहेक अरु धेरै तरिकाहरु छन ।
तल यस्तै "Right-click" Disable गरिएका साईटहरु बाट इमेज कपि गर्ने ३ तरिका बारे चर्चा गरिएका छन :

) Image लाई Desktop अथवा browser को address बारमा Drag & drop गरेरयो एउटा सजिलो तरिका हो । तपाईंले मात्र कपि गर्नु पर्ने इमेजलाई click गरेर Drag (क्लिक गर्दा गर्दै तानेर) गरेर डेस्कटपमा वा अन्त कतै Local डिस्कमा लगेर छाडिदिनुहोस् । इमेज Automatically त्यहा डाउनलोड भएर त्यहा save हुनेछ । यो Firefox र Internet Explorer ब्राउजर दुइटैमा काम गर्छ ।
अथवा
तपाईंले इमेजलाई Drag गरेर Firefox ब्राउजरको Address बारमा लगेर छाडिदिनुहोस् यस्रो गर्दा उक्त ब्राउजरमा तपाईंको इमेज लोड हुनेछ र त्यसपछि तपाईं उक्त इमेजलाई right-click गर्नमा फ्री हुनुहुनेछ ।

) Firefox ब्राउजरमा पेज info. open गरेर
यदि कुनै कारणबास Drag and Drop method ले काम गरेर भने यो तरिका अपनाउन सकिन्छ ।
@ Firefox मा इमेज कपि गर्नु पने साईट खोल्नुहोस्
@ मेनु बारमा रहेको Tools मा क्लिक गरेर त्यहा Page Info. मा जानुहोस् ।
@ Media Tab मा क्लिक गर्नुहोस् ।
@ त्यहा तपाईंलाई डाउनलोड (copy) गर्नु पर्ने इमेज खोज्नुहोस् र क्लिक गर्नुहोस् ।
@ अब "Save As" बटन मा क्लिक गरेर location दिएर ओके गर्नुहोस् ।

) Print screen, crop, save
यदि माथिको method हरुले काम गरेन भने अन्तिम तरिका यो पनि हुन सक्छ । यो राम्रो तरिका नभए पनि यसरी पनि सजिलै इमेज लाई कपि गर्न सकिन्छ । तर यसमा तपाईंलाई इमेजलाई printsereen गरेर crop गरीराख्नु पर्ने झन्झट छ ।
@ इमेज कपि गर्नु पर्ने साईट खोल्नुहोस् ।
@ ब्राउजरमा Scroll गरेर कपि गर्नु पर्ने इमेज देखिने गरी राख्नुहोस् ।
@ अब तपाईंको keyboard मा भएको "Print Screen" बटन थिच्नुहोस् ।
@ MS Paint प्रोग्राम अथवा अरु कुनै इमेज editing सफ्टवयर खोल्नुहोस् ।
@ "Ctrl+V" गर्नुहोस् ।
@ त्यहा तपाईंको स्क्रीनमा देखिएको जस्तै इमेज पेस्ट हुनेछ र अब तपाईंलाई चाहिने इमेजलाई मात्र corp गरेर save गर्नुहोस् ।

Right-click Disable गरिएका वेबसाईटहरु बाट यि तरिका अपनाएर इमेजलाई कपि त गर्न सकिन्छ तर यो पनि बिचार गर्नु जरुरी छ कि copyright गरिएका वा permission बिना कपि गर्न निषेध गरिएका इमेजहरुलाई बिना permission कपि गरेर आफ्नो प्रयोजनको लागि प्रयोग गर्नु illegal नै हो ।

Read More »

घरमा बसी बसी संसार भरिको साथीहरुको कम्प्युटर चलाऊनुस्

0 comments
के तपाईं लाई थाहा छ तपाईं घरमा बसी बसी संसार भरिको साथीहरुको कम्प्युटर चलाऊन सक्नु हुन्छ ?? फाइलहरु transfor गर्न सक्नु हुन्छ । एउटा यस्तो सफ्टवेर छ जुन तपाईंले आफ्नो कम्प्युटरमा डाउनलोड गर्नु पर्ने हुन्छ र तपाईंले चलाऊन चाहनु भएको कम्प्युटरमा पनि त्यो सफ्टवेर डाउनलोड भएको हुने पर्छ ।
सबै भन्दा राम्रो desktop sharing प्रोग्राम साबित भईसकेको Team Viewer प्रोग्राम अझै नयाँ भर्सन TeamViewer 6.0 Build 10124 Final मा उपलब्ध भईसकेको छ । यो फ्री प्रोग्राम मा डेस्कटॉप शेयरिंग, फाइल ट्रान्सफर, अडियो, भिडियो च्याट जस्ता नयाँ सुबिधाहरु जोडिएर आएको छ जसले यो प्रोग्रामलाई अझै उपयोगी बनाउन मद्घत गरेको छ । यसमा QuickJoin नामको नयाँ सुबिधा छ जो प्रेजेंटेशनको लागि अति उपयोगी छ । यो प्रोग्राम अहिले पहिले भन्दा धेरै स्पीडमा र हेर्नको लागि आकर्षक भएको छ । अब तपाईं यसबाट एक भन्दा धेरै जना हरुसँग छिटो र सजिलै connection हुन सक्नुहुनेछ । यदि कारणबस connection छुटी हाले पनि आँफै फेरी जोड्ने (स्वचालित) हुने यो नया भर्सन पहिले भन्दा धेरै सुरक्षित पनि छ किनकी यसमा तपाईंले धेरै बिकल्पहरुमा पासवोर्डले protect गर्न पाउनु हुनेछ ।

सिर्फ 3.4 mb मा उपलब्ध यो software डाउनलोड गर्न यहाँ क्लिक गर्नुहोला ।

software डाउनलोड गरी सके पछी त्यहा ID र password display भएको हुन्छ , त्यस्तै तपाईंको साथीकोमा पनि display भएको हुन्छ । तपाईंले connect गर्न चाहनु भएको साथिको ID र password आफ्नोमा राखी connect गरे पछि तपाईंको डेस्कटपमा साथीको डेस्कटप display हुनेछ , त्यसपछी तपाईंले option मा remote suport , file transfor आदी गर्न सक्नु हुनेछ । एक चोटि connect भई सके पछि तपाईंले आफ्नो कम्प्युटरमा save गरेको Data हरु साथीको कम्प्युटरमा पठाउन सक्नु हुनेछ वा साथीको Data हरु आफ्नोमा transfor गर्न सक्नु हुनेछ । एकदम रमाइलो यो सफ्टवेर एक चोटि चलाएर हेर्नुस् अनी भन्नुस ।
" तर यो सफ्टवेर चलाऊदा आफ्नो ID र password जो सुकै लाई नदिनु होला नत्र तपाईंको महत्वपूर्ण फाइलहरु तपाईंको partner ले एताउता वा Delete गरी दिन सक्छ"

Read More »

आफ्नो वेब-ब्राउजरको पुण्य-तिथी ( एक्स्पाईरी डेट ) थाहा छ

0 comments
..एउटा नयाँ शोधमा यो कुरा अगाडि आएको छ कि ईन्टरनेट प्रयोगकर्ताहरु मध्य ४० प्रतिशत आफ्नो ईन्टरनेट ब्राउजरलाई अप टु डेट राख्दैनन भन्नुको मतलब नयाँ update आईसक्दा पनि आफ्नो पुरानो ब्राउजरलाई त्यतिकै राख्दछन update गर्दैनन । जसको परिणाम स्वरुप अन-लाइन सुरक्षामा खतरा हुन्छ र उनिहरुको कम्प्युटरमा भाईरस आक्रमण र अरु सँक्रमणको शिकार भईरहन्छ ।

शोधकर्ताहरुमा गूगल र आई बि एम का बिशेशग्यहरु शामिल थिए र यो आकँडा विस्वसनिय होस् भन्नको लागि विश्वभरीका १०४८ बिलियन नेट प्रयोगकर्ताहरुको खाताको जानकारी राखिएको थियो जसमा IE7, फ़ायरफ़ाक्स, सफ़ारी, ओपेरा आदी सबै ब्राऊजरहरुको प्रयोग गर्नेहरु शामिल थिए ।
जसअनुसार पुरानो भर्सन प्रयोग गर्नेहरुमा विन्डोजमा चल्ने ईन्टरनेट-एक्स्प्लोरर प्रयोगकर्ताहरु सबै भन्दा बढी छन भने फ़ायरफ़ाक्सको प्रयोगकर्ता सबैभन्दा कम ।
त्यसैले तपाईंपनि आफ्नो कम्प्युटरको वेब ब्राउजरलाई अप टु डेट राख्ने गर्नुहोस् र सम्भाबित सन्क्रमण र आक्रमण बाट बच्नुहोस् , यदि तपाईंको ब्राउजरमा Auto अपडेट option छ भने त्यस्लाई चालु राख्नुहोस् अन्यथा आँफै यो कार्य गर्नुहोस् ।
त्यसो त अहिले यो आईडियामा बिचार बिमर्श जारी छ कि हरेक ब्राउजरमा एक्स्पाइरी डेट राख् ने जस्तोकि औषधी, दुध, पाउरोटीहरुको एक्स्पाइरी डेट हुने गर्छ जसले गर्दा प्रयोगकर्ताहरुमा ब्राउजरलाई नबिकरण गर्ने बारे याद गर्न मद्घत मिल्नेछ ।
पुरा शोधको जानकारी यहाँ क्लिक गरेर हेर्नसक्नु हुनेछ ।

Read More »

भिडियो हेर्नु भयो ? त्यसलाई आफ्नो कम्प्युटरमा कपि गर्नुहोस्

0 comments
youtube.com, googlevideo.com, video.com.np लगायत अरु धेरै भिडियो sharing साईटहरुबाट जब हामी कुनै भिडियो हेर्छौ त्यो भिडियो हाम्रो कम्प्युटरको local disk मा cache को रुपमा स्टोर भईरहेको हुन्छ । यो कुरा धेरैजसोलाई थाहा छैन र हामीले हेरीसकेको भिडियो आफ्नो कम्प्युटरमा save गर्नको लागि फेरी कुनै downloading software को सहायता लिएर फेरी download गर्छौ । जबकि उक्त भिडियो पहिले नै browser cache मा save भई सकेको छ भने फेरी किन त्यही भिडियोलाई download गरेर टाईम loss गर्ने ???

त्यसैले आज यस्तो एउटा utility को बारेमा चर्चा गर्नेछु जसको मद्घतले हामीले watch गरेको भिडियोलाई browser cache बाट सजिलै तपाईंले desktop वा local disk मा कपि गर्न सक्नु हुनेछ । यो utility बाट तपाईंले कुनै पनि हेरिसकेको भिडियोलाई सिधै save गर्न सक्नुहुनेछ र यसको लागि अरु कुनैपनि downloading software को जरुरत पर्दैन ।

अब यो utility को बारेमा केही चर्चा गरौ ...
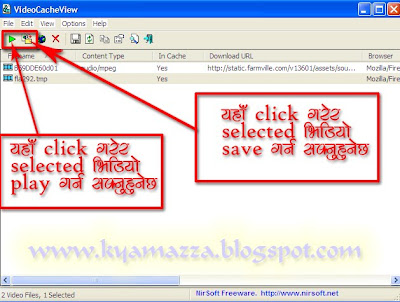
यो utility को नाम हो "Video cache viewer" र यसले माथि भनिए जस्तै तपाईंले watch गरीसकेको भिडियोलाई सिधै कपि गर्न मद्घत गर्छ । सामान्यतया हामीले watch गरिसकेको भिडियो अटोमेटिकल्ली Browser Cache मा store भईसकेको हुन्छ र त्यही store भएको भिडियोलाई यो utility को मद्घतले आफ्नो कम्प्युटरको local disk मा कपि गर्ने हो जसलाई हामीले भबिस्यमा फेरी कुनै पनि बेला watch गर्न सक्छौ । यहाँनिर यो पनि याद राख्नु जरुरी छ कि हामीले हेरेको सबै भिडियोहरु cache मा store हुँदैनन तर पनि धेरैजसो चाँही store नै हुने गर्छ ।

यो "video cache viewer" ले automatically Internet Explorer र Mozilla firefox वेब ब्राउजरको सबै cache हरु स्क्यान गर्छ र त्यहा store भएका video cache (Video file) लाई देखाउछ । यदि cache present छ भने यसले cache application window मा video display गर्छ र त्यो display भएको video लाई नै हामीले आफुले चाहेको ठाउमा save गर्ने हो । त्यसैले अब चिन्ता नगर्नुहोस् , तपाईंले एक चोटि watch गरिसकेको video लाई save गर्न अरु software को प्रयोग गर्नु पर्नेछैन ।

.................................यो utility डाउनलोड गर्न यहाँ क्लिक गर्नुहोला


utility डाउनलोड गरिसकेपछि install गरेर run गर्नुहोस् त्यहा तपाईंले केही option हरु देख्नुहुनेछ तर हामीलाई अरु option को त्यती जरुरी छैन , हामीलाई मात्र “Play selected File” र “Copy selected Files To…” option को जरुरी छ ।

“Play selected File”
यो option त्यहा display भएका video हरु मध्य कुनैलाई highlight गरेर play गर्न काममा आउछ तर तपाईंको कम्प्युटरमा भएको player ले .flv फरम्याटको फाइल support गर्ने हुनु जरुरी छ । (यदि तपाईंसँग .flv player छैन भने यहाँ क्लिक गरेर player डाउनलोड गर्न सक्नुहुनेछ । )

“Copy selected Files To…”
यो option नै सबैभन्दा काममा आउछ किनकी यसैबाट हामीले select गरेको भिडियोलाई आफ्नो कम्प्युटरको local disk मा location browse गरेर save गर्न सक्छौ ।

अरु option हरु पनि usefull नै छन use गरेर हेर्नुहोला ।

Read More »

निःशुल्क सन्देश पठाउने सफ्टवेयर

0 comments


एउटा मोबाइलबाट अर्को मोबाइलमा लिखित सन्देश -(एसएमएस) पठाउन अब खर्च नलाग्न सक्छ किनभने हालै एउटा सफ्टवेयरको विकास भएको छ जसको माध्यमवाट निःशुल्क एसएमएस पठाउन सकिन्छ। भारतीयमूलका सवीर भाटियाको कम्पनी ज्याक्सटर इंकले उक्त सफ्टवेयर हालै सार्वजनिक गरेको हो। सन् १९९६ मा ज्याक स्मिथसँग मिलेर भाटियाले हटमेल बनाएका थिए। पछि उक्त हटमेल बिल गेट्सको कम्पनी माइक्रोसफ्टलाई बेचिएको थियो। तिनै भाटियाले मोबाइलको संसारमा नयाँ क्रान्ति ल्याएका हुन्। निःशुल्क एसएमएस पठाउन मिल्ने 'ज्याक्स्टर एसएमएस' नामको उक्त सफ्टवेयर हालै मुम्बईमा सार्वजनिक गरियो। निःशुल्क एसएमएसको विकासलाई मोबाइल सेवा प्रदायक कम्पनीले कसरी लिनेछन्, यो अर्कै कुरा हो। यद्दपि ज्याक्सटर एसएमएसले विश्वका करिब दुई सय देशका सेवाग्राहीलाई प्रभावित बनाउनेछ।
ज्याक्सटर एसएमएस कुनै पनि मोबाइल फोनमा प्राप्त गर्न सकिनेछ। सन्देश प्राप्त गर्ने मोबाइलधनीसँग यो सफ्टवेयर हुन आवश्यक छैन। त्यसो त यो यस्तो सफ्टवेयर हो, जसका लागि प्रयोगकर्ताले कुनै इन्टरनेट एप्लिकेसन डाउनलोड गरिरहनु पर्दैन। आइफोन, एन्ड्रोइड, ब्ल्याकबेरी जस्ता मोबाइल प्लेटर्फममा यो सफ्टवेयर सजिलै डाउनलोड गर्न सकिन्छ। भाटियाले भनेका छन्- '१५ वर्षअघि हामीले विश्वलाई हटमेल उपहार दिएका थियौं, आज ज्याक्सटर एसएमएस दिँदैछौं।'
सफ्टवेयर Download गर्न यहाँ क्लिक गर्नुहोला

Read More »

Internet Radio Player And Recorder (Free Version)

0 comments

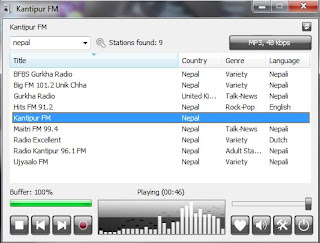
Radio? Sure! (Free Version) is an Internet radio player and recorder that comes preloaded with more than 12000 free online radio stations from all around the world. You can search the list by keyword, sort it by country, genre or language and maintain a list of your personal favorites for quick access. The program also allows you to record the radio stream you are listening to and can automatically split the recording into individual mp3 files - one for each track. Other features include the option to add your own stations, support for multiple stream sources, automatic crossfading for smooth transitions when switching stations, command line parameters and keyboard hotkeys

“RadioSure” gives you the smoothest radio listening experience. The main rule is – it should be simple, reliable and should just work.


Main features are:

More than 17000 of stations in the package
Supports most of the internet radio formats – mp3, wma, ogg vorbis, aac+ and so on
Quick and reliable search for your favorite radio stations
Smooth switching between stations including crossfade effect
Recording what you are listening to and packaging it into separate song files
Simultaneous recording of multiple stations
Automatic checking for software and radio stations updates
Command line parameters for automatization
Runs on Windows XP SP3, Vista, Windows 7 (32 and 64 bit)
UNICODE support – all domestic stations are perfectly visible and searchable
and much much more…

Don’t you still want to try?
Just download and enjoy it!

Read More »

Complete Internet Repair

0 comments


यदि तपाईंले गल्तीले आफ्नो कम्प्युटरको Internet को settings चलाऊनु भएको छ वा कुनै virus को कारण setting बिग्रेर समस्या भोगी रहनु भएको छ भने यो tool ले तपाईंलाई मद्त गर्न सक्छ ।
Complete Internet Repair नामको यो Tool आफ्नो नाम अनुसार नै तपाईंको कम्प्युटरको Internet सँग सम्बन्धित लगभग सबै समस्याहरुको समाधान गर्नको लागि उपयोगी छ । यसमा तपाईंले धेरै बिकल्प (option) हरु पाउनु हुनेछ र आफ्नो इच्छा अनुसार बिकल्पहरु छानेर वा सबै बिकल्प एकैचोटी छानेर आफ्नो windows को मुल internet Setting प्राप्त गर्न सक्नु हुनेछ ।

It could help if you are experiencing any of the following problems:
@ Internet or network problem after removing adware, spyware, virus, worm, Trojan horse, etc.
@ Loss network connection after installing/uninstalling adware, spyware, antispam, vpn, firewall or other networking programs.
@ Unable to access any webpage or can only access some webpages.
@ Pop-up error window with network related problem description.
@ No network connectivity due to registry errors.
@ DNS lookup problem.
@ Fail to renew the network adapter’s IP address or other DHCP errors.
@ Network connectivity issue with limited or no connections message.
@ Windows update does not work
@ You are having problems connecting to secured websites (ex. Banking).
@ Internet Explorer stopped working or crashes all the time.
@ Other networking problems.

जम्मा 438 KB को Complete Internet Repair एकदम सजिलो Utility हो । यसलाई तपाईंले कम्प्युटरमा Install गरिराक्नु पर्ने जरुरी पर्दैन । बस यसलाई Unzip गर्नुहोस् र ClntRep.exe नामको फाइल Run गरिदिनुहोस् ।
Version: 1.2.8.1280
Release Date: August 5th 2011
System Requirements: Windows XP, Windows 2003, Windows Vista, Windows 7
Disk Space: 1 MB

Read More »

Free मा कम्प्युटरमा टि।भी च्यानल हेर्ने कि ?

0 comments


ईन्टरनेट संसारमा अनलाइन टि.भी च्यानल हेर्ने थुप्रै Software का साथसाथै साईटहरु पनि पाईन्छन । कुनै फ्री हुन्छ त कुनैको लागि पैसा तिर्नु पर्ने हुन्छ । यहाँ यस्तै फ्रीमा उपयोग गर्न पाइने एउटा software को बारे चर्चा गरिदैछ । "Readon TV Movie Radio Player" एउटा यस्तो फ्री Software हो जसको मद्तले तपाईंले संसार भरिका चुनिएका टि.भी प्रोग्रामहरु हेर्न र एफ.एम स्टेसनहरु सुन्न सक्नु हुनेछ । हुन त नेपालको सन्दर्भमा यो software त्यती उपयोगी नहोला किनकी यसको लागि उच्च गतीको ईन्टरनेट Connection को जरुरत पर्दछ तर जहाँ उच्च गतिको ईन्टरनेट Connection छ त्यहा यसमा उपलब्ध टि.भी च्यानलहरु बिना रुकावत मज्जाले हेर्न सकिन्छ ।
यसमा बिभिन्न देशका साथसाथै छिमेकी देश भारतका केही चर्चित टि.भी च्यानलहरु हेर्न सकिन्छ , नेपालका च्यानलको कुरा गर्नेहो भने यसमा अहिले सम्म ३ वोटा च्यानल मात्र add भएका छन जसमा सगरमाथा टि.भी, एन टि.भी र एन टि.भी प्लस । यो software को अरु खास बिशेषता भनेको यसमा टि.भी च्यानल तथा एफ.एम स्टेसन हेर्न र सुन्न मात्र हैन Record पनि गर्न सकिन्छ र यसका साथसाथै यसबाट Video Converter, Record Audio from pc, Rip Audio CD जस्ता काम पनि गर्न सकिन्छ । तपाईंहरु पनि एक चोटि यो Software Download गरी प्रयोग गरी किन नहेर्ने त ?

Software download को लागि यहाँ क्लिक गर्नुहोला

यो प्रोग्राम चलाऊनको लागि तपाईंको कम्प्युटरमा Dot Net Framework 3.5 वा त्यो भन्दा माथिको भर्सन Install हुनु जरुरी छ ।


Read More »

Facebook shortcut keys for Mozilla Firefox and Internet explorer

0 comments
फेसबुक आजभोलि सबैको प्यारो बनेको छ । दिनमा एकपटक फेसबुक खोली status अपडेट नगरि, साथीहरुको Status नहेरी अथवा कमेन्ट नगरि त चित नबुझ्ने भईसक्यो । धेरैलाई थाहा नहुन सक्छ कि फेसबुक चलाऊदा पनि बिभिन्न shortcut key हरु प्रयोग गरेर अझ सजिलै यो चलाऊन सकिन्छ भन्ने कुरा । आज यहाँ फेसबुक चलाऊदा खेरी प्रयोग गर्न सकिने shortcut keys को बारे केही जानकारी राख्न गईरहेको छु । लौ अब तपाईंहरु पनि माउसको प्रयोग बिना नै फेसबुक चलाऊने हैन त ?

Shift+Alt+0 : facebook help center

Shift+Alt+1 : facebook homepage

Shift+Alt+2 : your facebook profile page

Shift+Alt+3 : friend request

Shift+Alt+4 : messages

Shift+Alt+5 : notification

Shift+Alt+6 : account page

Shift+Alt+7 : privacy setting

Shift+Alt+8 : facebook's page on facebook

Shift+Alt+9 : facebook terms of use

Shift+Alt+? : enable search

Shift+Alt+m : compose a new message

Enjoy Facebook !!!

Read More »

20 Websites To Have Fun With Your Photos

0 comments

Read More »

How To Delete a Facebook Account

0 comments

The Case To Delete a Facebook Account

#1. Privacy – You probably know a friend of a friend who has had their personal Facebook photos cause them problems in some walks of life. I’ve had friends who’ve been fired as high school sports coaches, reprimanded by their bosses and been in hot water with their wives over some tavern pictures posted on Facebook. The person in the picture doesn’t even have to post them in their own album as all it takes is a friend to ‘tag’ them before the photos are consumed by the masses. One of the best ways to seperate your online world from your real life to protect your privacy is to delete your Facebook account…but then you’ll still have to make sure you don’t become a Background Billy while other people are posing for pictures at the tavern.
#2. Productivity – Facebook is a huge time waster and many people find it’s very addicting. If you don’t have anything to do, you might find yourself checking in on Facebook only 1 or 2 times a day but the minute you get busy, suddenly your brain finds the temptation to refresh the news feed every 10 seconds. Combine that lack of productivity multiplied with time wasting apps such as Song Pop or Words With Friends, not to mention Instant Messaging with people on your contact list and you can easily blow a couple of hours in what seemed like minutes. Just as if you don’t have a delicious chocolate cake in your refrigerator you won’t be tempted to eat it, if there’s no Facebook, you won’t be tempted to creep on an ex’s profile…for 5 straight hours.
#3. Lack Of Interest – While at first it was fun to see (stalk) what long lost classmates and lovers had been up to over the years, you’ll probably eventually find out their life has become as boring as yours. My news feed is flooded daily with virtually the same statuses…”I love my kids”…”I just went to the gym”…”I just got out of jail”…”I have to go back to jail tomorrow.” I’d be surprised if most people in the world didn’t have the same frustrations over their repetitive friends.

How To Permanently Delete Facebook

If you want to delete your Facebook Account then you must be sure that you never want to use this account again  You will need to visit this page to fill in a form and request your account to be deleted.  This is what it says on Facebook:
Permanently deleting Facebook means you will not be able to reactivate your account or retrieve any of the content or information you have added.

Download Facebook Account Before Deleting

You can download your information from your Facebook account before deleting it as the information will be gone.
  1. Click at the top right of any Facebook page and select Account Settings
  2. Click General in the left-hand column
  3. Click on “Download a copy of your Facebook data”
  4. Click Start My Archive
Because this download contains your timeline information, you should keep it secure and be careful when storing, sending or uploading it to any other services.
download facebook account

Deactivating Facebook vs Deleting Facebook

You can deactivate your Facebook account instead of deleting it permanently.  The difference is that with deleting it is permanent and deactivating means you can reactivate your account at a later time.

How to Deactivate a Facebook Account?

To deactivate your account:
  1. Click the account menu at the top right of any Facebook page
  2. Select Account Settings
  3. Click Security in the left-hand column
  4. Click Deactivate your account
Just remember to keep your Facebook sign in details just in case you do want to reactivate.
Delete a Facebook Account

Why You Should Keep Facebook

Keep In Touch With Family – You can choose your friends but you can’t choose your family and even though they might post the same dumb stuff every day or blackmail you into joining Zynga Bingo, it’s nice to know what relatives all over the globe are up to. It also makes it a little less awkward at family reunions because Facebook gives you the feeling that you’re connected, even though you may be miles apart.
For An Extra Contact Port – Not everybody has your cell phone number but most people can easily find you and get in contact on Facebook. If there’s a big reunion, party, or newly single foreign exchange student that became a model after high school but truly never got over that one night you spent in the park…or if your friend needs a ride, they can contact you on Facebook. This can be good and bad but it is also essential in the case of an emergency.
To Look Technologically Savvy – Can you imagine a business in this day and age not having a website or any person under 60 not having an email address? Facebook could soon be the main contact point between people…whether a potential employer wants a second interview, buyers want to purchase your goods, or companies want to contact you because you won that all-inclusive trip to the Bahamas. Telling somebody you don’t have a Facebook account – while now not so bad – could raise red flags in the future.
To Look Back And Reminisce – Facebook’s Timeline feature offers a nice way to look back over the years and reminisce about your life. While the every day antics of Facebook might drive you crazy, it’s nice to ponder over the years as a whole and remember the people that influenced your life. It’s also motivating to look to the time you could wear a two piece bikini or alternatively you canlook back and promise never to wear those skinny jeans ever again.
Whether you decide to delete your Facebook Account or not is totally your decision. As the last tip, if you are thinking about deleting your Facebook, don’t be one of those people that ‘threatens’ to delete it every status update.
“So long Facebook Friends I need to take a break for awhile” Posted on Tuesday at 1:34
“ Just got back from the gym” Posted on Tuesday at 1:38

Read More »

Top 10 Facebook tips

0 comments
Below is a listing of our top 10 tips for the popular social networking website Facebook.
Hide users, games, polls, etc.
It quickly gets annoying seeing some users posts, game invites, polls, etc. Hovering your mouse to the right of the post and clicking the Hide button as shown below can hide any post. Once this button is pressed you'll be prompted with the option to hide that user or in the case of a Facebook application the option to hide that application from ever showing up on your profile.
Hide Facebook users, games, polls, etc.
To unhide someone or unblock an application click the Edit Options link in the bottom right corner of the news feed as shown below.
Facebook unhide friends
Greasemonkey and FB Purity
Although Facebook does not allow the ability to hide friends getting new friends messages, friends becoming fans of something, and some application messages they can still be hidden with browser add-ons. If you're running Mozilla Firefox, Chrome, Opera, or Safari we suggest installing the Facebook Purity add-on.
Update your privacy settings
Click Account in the top right corner of the Facebook window and then click Privacy settings to adjust who is capable of seeing what on your Facebook profile. We highly recommend going through all the privacy settings to verify your privacy is properly protected.
Anything that is not set to friends only or friends of friends can be seen by anyone searching on the Internet. Below is a few things we recommend for most users.
  1. Under Search in Privacy settings uncheck Public Search Results. This will prevent users from finding your account and profile picture in search results such as Google
  2. Under Application settings, make sure you're only allowing applications you want to have access to your information. Applications that you grant rights to can have access to your Facebook profile information.
  • If you're curious to see how a program or web page connect to the Facebook API can see your profile see Tip135.
Use the Facebook top bar for navigation
Facebook navigation
Knowing how to properly navigate is vital if you want to get the most out of Facebook. Below is a brief description of each of the available options in the top bar as shown above.
Home (facebook logo) - Clicking this logo will take you to your wall (News Feed) that shows all friends recent posts.
Friend requests - If any friend requests are waiting to be approved this icon will show a notification of how many friends are waiting for approval. This icon can also be clicked when you want to view any friend recommendations or search for friends on Facebook.
Messages - This section allows you to send and receive private messages between one or more people you're friends with.
Notifications - Any time a friend or Facebook application creates a new post you'll be notified in this section. Clicking this icon will show all recent notifications. If you wish to change what is capable of sending you notifications including any Facebook applications or games click the See All Notifications link at the bottom and check or uncheck what you want to be notified on.
Search - Finally, the search box in Facebook can be a powerful tool that can be used to quickly find any current friends or people on Facebook. In addition searching for terms such as a company name, product, sports team, music band, etc. will find fan pages and groups that can be joined.
Modify your account notifications
Keep your e-mail and your cell phone clean by updating or eliminate Facebook notifications or keep more up-to-date by adding new notifications. Facebook notifications can be added and removed by clicking Account link in the top right corner, then Account Settings, and then clicking the Notifications tab.
Top News and Most Recent
Facebook News and most Recent
By default Facebook will display your wall postings in the News format, which means it only displays posts it believes are most relevant to you. These results are based on your past interaction with your friends. If you want to see every post made by all your friends that are not hidden click the Most recent link in the upper right section of your news feed as shown in the above picture example.
If you want to adjust who shows up manually click the Edit Options in the bottom right corner of your news feed.
Facebook unhide friends
View High School work friends
If you've added your High School or previous Work locations to your profile, quickly see all classmates and co-workers on Facebook by clicking the link in your Info tab under your profile.
Quickly change profile picture
Your profile picture can be quickly changed to any other picture by visiting your profile, hovering the mouse over your current profile picture, and clicking the Change Picture link that appears in the top right corner of the picture.
Don't post private information on friend's walls on in comments
When you make a post on a friend's wall or in any of their comments realize that any of their friends are going to be able to see that post. If you wish for something to remain only between you and a friend send them a Facebook message instead.
Suggestions and random friend invites
As you get more friends on Facebook it will begin making friend, groups, and fan suggestions. These are suggestions made by Facebook and not your friends. Unless these are something you're interested in they can be ignored.
This same rule can be applied to people who may want to be your friend that you don't know. If you don't know someone don't accept his or her friend invite. Once someone becomes your friend they'll have access to any information your friends are capable of seeing.
Tag your Facebook friends in your photos
Always make sure to tag any of your Facebook friends that are in pictures you upload. However, never tag someone who is not in the picture. When someone is tagged in a photo that picture is automatically added to that persons profile and is a great way to share pictures with all friends.

Read More »

Top 10 Internet tips and tricks

0 comments
You don't need the http:// portion of a web page
When typing an Internet address you do not need to type http:// or even www. in the address. For example, if you wanted to visit Computer Hope you could just type computerhope.com and press enter. To make things even quicker, if you're visiting a .com address you can type computerhope and then press Ctrl + Enter to type out the full http://www.computerhope.com address.
Quickly move between the fields of a web page
If you're filling out an online form, e-mail, or other text field you can quickly move between each of the fields by pressing the Tab key or Shift + Tab to move back a field. For example, if you're filling out your name and the next field is your e-mail address you can press the Tab key to switch to the e-mail field.
Tip: This tip also applies to the buttons, if you press tab and the web developer has designed correctly the button should be selected and will allow you to press the space bar or enter to push the button.
Tip: If you have a drop-down box that lists every country or every state you can click that box and then press the letter of the state or country you're looking for. For example, is a drop-down box of States in the United States you could press u on the keyboard to quickly scroll to Utah.
Use Internet search engines to their full potential
Make sure to get the most out of every search result. If you're not finding what you want try surrounding the text in quotes. For example, if you were searching for 'computer help' this actually searches for pages that contain both computer and help and not necessarily pages that have computer and help next to each other. If you search for "computer help" with the quotes around the search query this will only return pages that actually have computer and help next to each other.
Tip: Many new computer users also don't realize that in every search box you can press enter instead of having to move the mouse button over to the Search button.
Protect yourself and avoid bad web sites
Know your Internet browser shortcuts
There are dozens of different shortcut keys that can be used with Internet browsers. Below are a few of our top suggested Internet browser shortcuts.
- Pressing Alt + D in any major Internet browser will move the cursor into the address bar. This is a great way to quickly enter an Internet address without having to click the mouse cursor in the address bar.
- Hold down the Ctrl key and press the + or - to increase and decrease the size of text.
- Press the backspace key or hold down the Alt key + left arrow to go back a page.
- Press F5 to refresh or reload a web page.
- Press F11 to make the Internet browser screen full screen. Press F11 again to return back to the normal view.
- Press Ctrl + B to open your Internet bookmarks.
- Press Ctrl + F to open the find box in the browser to search for text within the web page you're looking at.
Take advantage of tabbed browsing
Take full advantage of tabbed browsing in all Internet browsers today. While reading any web page if you come across a link you may be interested in open that link in a new tab so it can be viewed later. A new tab can be opened by holding down the Ctrl key and clicking the link or if you have a mouse with a wheel click the link with the middle mouse button.
Try alternative browsers
Most computer users use the default browser that comes included with the computer, with Microsoft Windows this is Internet Explorer. There are several great alternative browsers that are all free to download and use and may have features your current browser does not include. Below are a few of our favorites, try one or try them all.
Install plugins and add-ons
Each of the above alternative browsers also have a large community of volunteers who develop add-ons and plugins that can be added into the browser. Each of these browsers have hundreds of thousands of these add-ons that can do such things as giving you live weather in your browser window, changing its color, and adding additional functionality.
Make sure your browser and its plugins are up-to-date
Each Internet browser can have several additional plugins that give it additional functionality. For example, Adobe Flash is a great way to bring movies and other animated content to the Internet. Keeping these plugins up-to-date is vital for your computer stability and also security. Using the below tool you can quickly verify if your plugins are up-to-date and get links to where to download the latest updates.
Use online services
There are hundreds of free online services that can help make using your computer easier, more productive, and more enjoyable. See our top 10 online services for a listing of our favorites.

Read More »

how to protect gmail account from hackers

0 comments


Most of the people use Gmail for sending emails. We have precious information stored in our Gmail account. So Gmail would be the target for hackers being hacking it. Gmail developer team has given us wonderful security option by enabling the 2-step Verification,


By enabling the 2-step verification from you Gmail account makes your account more secure by making you to login into Gmail by 2 step. While logging in into the Gmail account, Gmail send you the security code to your mobile phone and asks you to enter that code in Gmail login page. This makes sure that only the mobile phone carrier can able to know that code. So your account cannot be Hacked if someone tries to hack your account from somewhere else.


How to enable 2-step verification

  • Log in to your Gmail Account,
  • Click Account at the top right,
  • Click Edit on 2-step verification,
  • Now Click Start Setup,
  • selcet your country and add your mobile number,
  • Select the method of verification, SMS option is by default and it is most recommended one
  • Just click Send Code
  • Now Google will send you Text in your mobile with Verification Code
  • Now click Next, and NextNote this point after 2-step Verification
  • Your Another Application and Connected account will not be working, you need to re-invoke that on Final 2-step Verification or do it later!
  • If your Primary Moblie is lost then you cannot able to login to Gmail so set Backup Mobile Number
  • Backup Verification Code is the another way to Recover your Account Please Download and Note that number and keep it safely somewhere it is accessible for you, like your Wallet. Each code can be used only once.
  • I recommend you to read everything and make a note of it.
Happy with your safe Gmail Account. This time none can Hack your Gmail, I hope. Please comment below and also mention me if I have missed any point.

Read More »

How to change your facebook theme

0 comments


Bored with the same BLUE&WHITE facebook theme This is a very cool trick to change theme of your facebook profile and make it cool ... just look at my facebook page  below ... is'nt it looking cool..! huuha now i'll explain you how to do it in this post ....
BEFORE INSTALLING THEME
  

AFTER INSTALLING THEME


Requirement: The basic requirement for this to work is to have Mozilla Firefox 3.5 or higher


Steps To change facebook theme: The following steps should be carried out to successfully change Facebook theme.

  •    Follow the basic steps and install the addon.

  •     Restart Firefox after successfully installing the stylish addon.

  •     Login to your Facebook Account and click on the small 'S' button in your Firefox status bar.Stylish Button 
  •     Click on "Find Styles for this Site" to open a new tab with free themes to use for Facebook.

  •     Click on any theme and a preview will be shown.

  •     If everything is fine in the previewed theme, click on "Install with Stylish" button at the top right corner of the page
Install with stylish
.

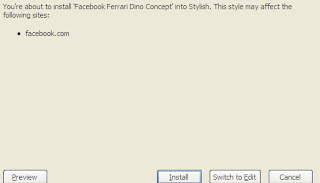
  •     A dialog box will open.
Installing Ferrari theme for Stylish Firefox


  •     Click on Install in the dialog box.
Now your facebook will look different depends upon which theme you selected. 
like I selected this One...cool naa..! enjoy..


Read More »

How to create facebook Chat codes

0 comments


Have you seen People sending Smiles and images that are not part of Facebook Traditional chat codes.
Here in this post You will see how easy it is to create these codes and Impress you Facebook friends
Like, The best part is you can create your Unique codes . You can create codes of any image stored in you computer, by following these steps

Follow these Steps :- 
1. Go to Smileyti

2. Click on "Browse" and select The  picture you want to use in facebook chat.

3. Enter captcha code.[If you get one]

4. Click on "Upload Now" .

5. It will generate code in few seconds in This form<< [[512585645451273]] [[512585638784607]] >>
Copy The code
   
6. Paste it in facebook chat and hit enter.
 DONE :D


Read More »

निशुल्क एन्टीभाईरस #free #antivirus

0 comments
यदी तपाई माईक्रोसप्ट उत्पादीत विन्डोज अपरेटिङ्ग सिस्टम प्रयोग गर्नु हुन्छ भने अवश्य पनि एन्टीभाईरस प्रोग्राम राख्नु भएको होला । राखी सक्नु भएको छैन भने कुन र कस्तो एन्टीभाईरस राख्ने भनेर दुबिधामा हुनु हुन्छ होला किनभने ईन्टरनेट बजारमा एन्टीभाईरस बनाउने कम्पनीले सबैभन्दा राम्रो भनेर जुन उत्पादनको प्रचारको गरीरहेको हुन्छ त्यही उत्पादनको निशुल्क संस्करण पनि उपलब्ध हुन्छ । अवश्य पनि शशुल्क सफ्टवेयरमा पाईने केही फिचरहरु निशशुल्क पाईने सफ्टवेयरमा उपलब्ध हुदैनन तर पनि निशुल्कमा उपलब्ध नभएका ति फिचरहरुको काम के हो भनेर नबुझ्दा प्रयोगकर्ताहरु त्यही उत्पादन सित्तैमा पाईरहेको छ भने किन पैसा तिर्ने भने अलमल्लीरहेका हुन्छन । अझ केही एन्टीभाईरस मा शशुल्क प्रोग्राममा पाईने सबै फिचरहरु केही निश्चीत समयाबधीको लागी भनेर निशशुल्क संश्करण उपलब्ध गराएको पनि हुन्छ । यती सबै कुरा गरीसक्दा तपाई झनै दुबिधामा पर्नु भएको हुन सक्छ तर जडी कुरा के हो भने निशशुल्क पाईने एन्टीभाईरस प्रोग्राम तपाईकोलागी पर्याप्त हुदै हैन ।

निशुल्क उपलब्ध गराईएका प्रोग्रामहरु एक हिसाबले तिनै शशुल्क उत्पादनको बिज्ञापन हो । केही निशश्चीत समयवधीको  लागी निशुल्क उपलब्ध गराईएको होस वा केही फिचरहरु डिसेबल गरेर बितरण गरिएको सफ्टवेयर बास्तबमै प्रयोगकर्ताको आवश्यकता पुर्णरुपमा परिपुर्ति गर्न सक्षम हुनै सक्दैनन । उत्पादकहरु प्रयोगकर्ता कुनै एउटा अवश्थामा पुगेर आफ्नो उत्पादन प्रयोग गर्न बाध्य हुन भन्ने अभिप्रायले त्यस्ता सफ्टवेयरहरुको निशुल्क बितरण गरीरहेका हुन्छ । यसमा टेक्नीकल सपोर्ट देखी त्यसैको शशुल्क संस्करणमा उपलब्ध भएको फायरवाल लगायत अन्य थप  पुर्ण सुरक्षाको उपायाहरु अबलम्बन गरीएको हुदैन । प्रयोगकर्ताले कुनै बिन्दुमा पुगेर कि सबै प्रोग्राम नै अनईन्सटल गर्नु पर्ने कि त्यसै सफ्टवेयरको शशुल्क सफ्टवेयर खरिद गर्नु पर्ने हुन जान्छ ।
अझ हाम्रो जस्तो पाईरेटेड सफ्टवेयर छ्यासछ्यास्ती पाईने कम्प्युटर बजारमा एन्टीभाईरस नै पनि लाईसेन्स सहितको भनेर सिडी कै मुल्यमा पाईन्छ । शशुल्क उपलब्ध हुने फूल भर्सन प्रोग्राम प्रयोग गर्ने लोभमा यस्ता प्रोग्राम ईन्सटल गर्नु चाही अन्ततगोत्वा प्रोयोगकर्ताको हितमा हुदैन अझ बरु समस्या उत्पन्न हुन जान्छ । जस्तो कि ईन्टरनेटवाट फैलिरहेका नयाँ नयाँ भाईरस डिलिट गर्नको लागी एन्टीभाईरस प्रोग्रामको भाईरस डेफिनेसन डाटाबेस अपडेट हुनु पर्दछ र मात्र तपाईको कम्प्युटरमा महिनौ पहिले ईन्सटल गरेको एन्टीभाईरस प्रोग्रामले गत महीना देखि फैलिएको भाईरस वा यसै प्रकारका फाईल डिलिट वा डिसईन्फेक्ट गर्न सक्दछ ।  भाईरस डाटाबेस अपडेट हुदाँ सो एन्टीभाईरस प्रोग्रामले जुन कम्प्युटरमा प्रोग्राम अपडेट हुदैछ सो कम्प्युटरमा ईन्सटल भएको प्रोग्रामको लाईसेन्स पनि चेक गर्छ । पहिले नै प्रोयोग भै सकेको वा प्रोग्राम लाई तोडमोड गरी तयार गरी प्रयोग भएको लाईसेन्स कि एन्टीभाईरस प्रोग्रामको मेन सर्भरमा नभेटिएमा त्यो प्रोग्रामलाई ब्लाकलिष्ट गर्नुको का अतिरिक्त सो कम्प्युटरको म्याक एड्रेस लगायत आई पी एड्रेस लगायतका तपाईको कम्युटरको बिबरण सो एन्टीभाईरस कम्पनीको सर्भरमा स्टोर गरेर राख्न सक्दछ । 

तपाईले नयाँ एन्टीभाईरस प्रोग्राम खरिद गर्ने नै निर्णय गर्नु भयो भने पनि त्यस्ता केही फिचरहरु छन जस्लाई कहिल्यै नजर अन्दाज गर्नु हुदैन । नत्र शशुल्क प्रयोग गरीएका एन्टीभाईरस निशुल्क पाईने भन्दा पनि बेकारका हुन्छन । निशुल्कै पाईने एन्टीभाईरस प्रोग्राममा सकेसक्म एउटै प्याकेजमा भाईरस, वर्म, ट्रोजन तथा स्पाईवेयर लगायत किलगर फिसिङ्ग स्काम आदी प्रतिरोध गर्न सक्ने हुनु पर्दछ । यदी तपाईको कम्प्युटरमा अन भएको जुनसुकै बखत ईन्टरनेट कनेक्टेड हुन्छ भने तपाईले ईन्टरनेट सेक्युरिटी प्याकेज भएको एन्टीभाईरस प्रोग्राम प्रयोग गर्न उत्तम हुन्छ ।


यो लेख पुर्वाञ्चल बाट निष्कने स्थानिय ब्लाष्ट दैनिकको लागी तयार गरीएको थियो । जुन २०६९ साउन ७ गतेको अंकमा प्रकासित भएको छ । पत्रिकामा छापीएको आकारमा पढ्न यहाँ क्लीक गर्नुहोस ।

List of few antivirus software website

AhnLab Fortinet Panda
avast! F-Secure PC Tools
AVG G DATA Qihoo - 360
AVIRA GFI Sophos
BitDefender Kaspersky Tencent - QQ
BullGuard McAfee Trend Micro
eScan Microsoft Webroot
ESET

Read More »

ब्लगस्पट (ब्लगर) को पक्षमा

0 comments
गुगलको ब्लग होष्टीङ्ग साईट ब्लगर डट कममा यस्ता केही फिचरहरु बिध्यमान छन जस्ले गर्दा निशुल्क उपलब्ध अन्य ब्लगिङ्ग प्लेटफर्म भन्दा यसलाई उत्तम मान्न सकिन्छ ।

जस्तो कि ब्लगरमा यसको को ब्लगस्पट युआरएल लाई हटाएर आफ्नै कष्टम डोमेन प्रयोग गर्न सकिन्छ ।  साधारण प्रयोगकर्ताले यो साईट ब्लगरमा होष्ट गरीएको हो भनेर थाहा पाउने न्याभबार हटाउन सकिन्छ । यसमा तपाई फेसबुकको सोसल कमेन्ट बक्स देखि डिसकस को कमेन्ट सिस्टम ईन्सटल गर्न सक्नु हुन्छ । हुनलाई बल्गरकै पनि आफ्नो थ्रेड कमेन्ट सिस्टम नराम्रो छैन । ब्लगर साईटमा अपलोड गरीने फोटो पिकासामा स्टोर भएर रहने हुनाले ब्लगर खाताले पनि स्वत: पिकासामा १ गिगाबाईट बराबरको फोटो स्टोर गर्ने स्पेश प्राप्त गर्दछ । यसमा साधारण वेबसाईटहरुमा रहने विजेटहरु समावेस भएको हुनाले केही क्लीक गरेकै भरमा त्यसलाई आफ्नो साईटमा राख्न सकिन्छ ।  यसको लागी प्रोग्रामीङ्ग नलेज हुन जरुरी देखिदैन ।  कस्टम डोमेन प्रयोग नगरेको भए होष्ट गरी सकेको साईटको युआरएल परिवर्तन गर्न सकिन्छ । शादी डट कम, गुगल एडसेन्स जस्ता कन्टेन्टको आधारमा आम्दानी गर्न सकिने बिज्ञापनहरुलाई पनि आफ्नो ईच्छा गरेको स्थानमा राख्न सकिन्छ । यदी तपाईलाई CSS को बारेमा ज्ञान छ भने आफ्नो साईटलाई ईच्छा अनुसारको ले आउटमा परिवर्तन गर्न सक्नु हुन्छ । छैन  भने पनि केही छैन ब्लगरको आफ्नै टेम्प्लेट डिजाईन टुल्स छ जसको प्रयोगले तपाई आफ्नो साईटको काँचुली फेर्न सक्नु हुन्छ ।

पोष्टलाई ईमेल सब्सक्राईब गर्ने फिचरमा पनि ब्लगरको राम्रो पक्ष हो । हुनलाई यस खालको फिचर वर्डप्रेस र आरएसएस फिड उपलब्ध गराउने सबै साईटमा राख्न सकिन्छ तर यसमा ईजी टु युज छ । यसको पेज र पोष्ट फिचरलाई राम्रो सँग प्रयोग गर्ने हो भने सानो तिनो सिएमएस लाई माथ ख्वाई दिन्छ । यसको ग्रुप ब्लगीङ्ग अर्को राम्रो फिचर हो । ग्रुप ब्लगङ्गि को फिचरलाई प्रयोग गरेर कुनै ब्लग साईटको वनरसिप नै परिवर्तन गर्न सकिन्छ । ब्लगरमा तपाई गुगलको एउटै खाताले एक भन्दा बढी ब्लग सञ्चालन गर्न सक्नु हुन्छ ।

ब्गलरको अर्को राम्रो पक्ष भने यसको लागी निशुल्क रुपमा उपलब्ध बिबिधतापुर्ण टेम्प्लेट डिजाईन पनि हो ।  गुगलमा सर्च गर्नु भयो भने लाखौ को संख्यामा ब्लगर टेम्पल्लेट पाउनु हुन्छ । बिजनेस कार्ड डिजाईनको देखी दुई देखी तिन कोलम मा उपलब्ध टेम्लेटलेट साधारण प्रयोगकर्ताको आवश्यकता सजिलै पुरा गर्न सक्छ । जस्तो कि तल केही नेपाली न्युज पोर्टलहरुको लिङ्क दिईएको छ जस्को डिजाईन अन्य सेल्फ होष्टेटड साईट भन्दा कम देखीन्न र एउटा न्युज पोर्टलमा देखीने सबै जस्तो फिचर उपलब्ध छ ।

ब्लगरमा होष्ट गरीएका केही प्रतिनिधीमुलक न्युज पोर्टलहरु

हाम्रो संसार डट नेट


बुटवल अनलाईन डट कम

हेल्लोखबर डट कम


Read More »

ब्लगर (blogspot.com) टिप्स ट्रिक्स

0 comments
ब्लगरको सबडोमेन (.blogspot.com) हटाएर आफ्नो डोमेनमा प्रयोग गर्न पाईने हुदाँ (चलाखी पुर्वक) ब्लगर (blogger.com) लाई ब्लगिंङ्गको लागी मात्र नभएर अरु काममा पनि प्रयोग गर्न सकिन्छ । यसरी कस्टम (CMS को रुपमा ??) साईटको रुपमा ब्लगरमाई प्रयोग गर्नु परे तल दिए अनुसारका केही परिवर्तन गर्नु पर्छ ।

  1. पेज वा पोष्टको मुनि हुने Home लिङ्क
  2. पेज वा पोष्टको मुनि हुने Subscribe to: Posts (Atom) लिङ्क
  3. Powered by Blogger.भन्ने लिङ्क
  4. ब्लगरको फेभीकोन
  5. न्याभ बार (Nav Bar)
 माथी उल्लेख गरेको ब्लगरको फिचरलाई निस्क्रीय गर्न वा मेटाउन लागी तल दिए अनुसार प्रयोग गर्न पर्छ ।


पेज वा पोष्टको मुनि हुने Home भन्ने लिङ्क कसरी हटाउने

यसको लागी CSS मा गएर
#blog-pager {
display:none;
}
भन्ने CSS थपि दिनु पर्छ ।

पेज वा पोष्टको मुनि हुने Subscribe to: Posts (Atom) लिङ्क

यसको लागी CSS मा गएर
.feed-links {
display:none;
}

भन्ने CSS थपि दिनु पर्छ ।
वा
< b:include data='feedLinks' name='feedLinksBody'/ > लेखेको खोजेर त्यसलाई मेटाई दिनु पर्छ ।


Powered by Blogger.भन्ने लिङ्क कसरी हटाउने


Design >> Page Elements मा गएर Attribution भन्ने ईलेमेन्ट हटाउन सकिन्छ । तर सबै टेम्प्लेटमा यो ग्याजेटको रिमुभ बटन ईनेवल नभएको हुन सक्छ त्यसो भएको  भए < b:widget id="Attribution1" locked="true" title="" type="Attribution" > खोजेर  locked="true" खोजेर locked="false" बनाउन पर्छ ।


ब्लगरको फेभीकोन

< title >< data:blog.pageTitle/ >< /title > खोजेर त्यसको ठ्याक्क मुनि तल दिएको जस्तो ट्याग लेख्नु होस । फेबीकोनलाई गुगल डकुमेन्टमा अपलोड गरेर त्यसको Share Link लाई href="" मा राख्नु पर्छ ।
< link rel="shortcut icon" href="URL of your icon file" />

न्याभ बार (Nav Bar)


माथी देखिए जस्तो न्याभबार हटाउन तल दिएको CSS राख्नु पर्छ ।
#navbar-iframe { display: none; }


Read More »

आफ्नो डोमेनमा ब्लगर (blogspot.com) को साईट कसरी होष्ट गर्ने

0 comments
साधारणतया सबै डोमेन रजिष्ट्रारहरुको कन्ट्रोल प्यानलवाट लग ईन भएर डोमेन सेटिङ्गस चेन्ज गर्न सकिन्छ । ई-नेपाल मिडीया मार्फत खरिद गरेको डोमेनको कन्ट्रोल प्यानल वाट ब्लगस्पट डट कममा होष्ट भएको ब्लगमा कस्टम डोमेनमा कसरी होष्ट गर्ने तल दिएको छ ।

सब भन्दा पहिले डोमेन कन्ट्रोल प्यानलमा लगईन गर्नु पर्छ । कन्ट्रोल प्यानल लगईन गर्ने URL डोमेन रजिष्ट्राररै पिच्छे फरक हुन्छ । कन्ट्रोल प्यानलको URL तपाँईको डोमेन रजिष्ट्रर जसले गरि दिएको हो । उ सँग माग्न सक्नु हुन्छ ।


रजिष्ट्रार पिच्छे कन्ट्रोल प्यानलको लुक्स फरक भए नि त्यसमा प्रयोग भएका लिङ्कहरुको नाम र काम समान हुन्छन ।


डोमेन फर्वाड गर्न परेमा माथी दिएको लिङ्कमा क्लीक गर्नु पर्छ ।


DNS सेटिङ्गस परिवर्तन गर्न माथी देखाईएको लिङ्कमा क्लीक गर्नु होस ।


DNS क्लिक गरे पछी माथी दिए अनुसारको स्क्रीन देख्न सकिन्छ । तपाईको डोमेन रजिष्ट्रर गर्ने कम्पनीले उसको कम्पनीको लागी डीफल्ट नेम सर्भर जे राखेको छ करेन्ट नेम सर्भर त्यही देखिन्छ । तपाईको साईटलाई डोमेन कन्ट्रोल प्यानल बाट नै गुगल सर्भर प्वाईन्ट गर्नु पर्ने हुनाले त्यसो गर्न  XXXXXXXXXX.orderbox-dns.com वाला नेम सर्भर एक्टीभेट गर्नु पर्दछ । यसको लागी Auto-update nameservers मा क्लिक गर्नु पर्दछ ।


डोमेन कन्ट्रोल प्यानलमा XXXXXXXXXX.orderbox-dns.com नेम सर्भर अपडेट भए पछी माथी देखिए अनुसार स्क्रीन देखिन्छ । त्यस पछी Manage DNS मा भन्ने बटन दबाउनु पर्छ ।

माथी तपाँईले Manage DNS मा क्लीक गेरे पछी देखिने स्क्रीन यही हो । यहाँ पहिले नै A Record ईन्ट्री भै सकेको छ । ब्लगरको साईटको लागि A Record राख्न माथी देखीएको Add A Record भन्ने बटनमा क्लीक गर्न पर्छ ।

यदी तपाँइको डोमेन www.yourdomain.com हो भने होष्टनेम खाली राखि दिए हुन्छ । हैन, सब डोमेनमा (e.g blog.yourdomain.com) बल्ग चलाउन चाहनु हुन्छ भने होष्ट नेममा सबडोमेन (e.g. blog) राख्नु पर्छ । ब्लगगर को साईटमा तपाँईले  सबडोमेन (www बाहेक) जे राखी दिनु भएको छ यहाँ Host Name त्यही हुनु पर्छ । A Record चेन्ज गर्नको लागी तल दिए अनुसार IP Address हाल्नु पर्छ । TTL आफै 28800 लेखीएको हुन्छ त्यसलाई त्यसै छोडी दिए हुन्छ । ब्लगरको साईट चलाउनको लागी A Record अपडेट गर्दा राख्नु पर्ने IP Address हरु तल दिए अनुसार छन ।
216.239.32.21
216.239.34.21
216.239.36.21
216.239.38.21


माथी दिए अनुसार A Record अपडेट गरे पछी डोमेनको CNAME Record गर्नु पर्ने हुन्छ त्यसको लागि माथी दिएको CNAME Record मा क्लीक गर्नु पर्छ ।
 

त्यस पछी माथी देखाए अनुसारको स्क्रीन देखा पर्दछ । यहाँ पहिले नै मैले   CNAME सेट गरी सकेको छु । पहिले पटक हेर्दा खाली देखिन्छ र नयाँ CNAME रेकर्ड थप्नलाई माथी देखीएको Add CNAME Record मा क्लीक गर्नु पर्दछ ।


यहाँ CNAME Record अपडेट गर्नु पर्छ । माथी दिएको चित्रमा दिए अनुसार Host Name मा आफ्नो ब्लगको सब डोमेन लेख्नु पर्छ । यदी तपाईले आफ्नो डोमेनको URL www.yourdomain.com बनाउन चाहनु भएको भए Host Name मा www र Value मा रेडीयो बटनलाई तल झारेर ghs.google.com. लेख्नु पर्छ ।


यसरी कम्तीमा सब डोमेनको CNAME रेकर्ड मात्रै चेन्ज गरेर भए पनि ब्लगगरको साईटमा DNS म्यापिङ्ग गर्न सकिन्छ ।

Read More »