
Create a Run Cycle Animation From Scratch in Adobe Photoshop

In this tutorial I'll show you how to create an animation of a running cheetah, using a simple frame editor in Adobe Photoshop.
First we'll learn how to prepare a base for every frame without a perfect reference, learning what a run cycle is, then we'll add the body using big cat anatomy, shade the cheetah with very simple and effective method, and, in the end, we'll add the spots that follow the motion of the body.
While it's a run cycle specific for a cheetah, the techniques used can be easily adapted to any other animal. This is not going to be a "draw-a-frame-then-another-frame" kind of tutorial - my goal is to show you how to keep control over whole process instead of relying on artistic intuition only.
1. Base Building
First, we need a set of poses of a running animal. If we're not familiar with its anatomy, we may want to find a reference. And here's where a problem occurs - good quality videos of a run cycle, especially in slow motion, are created for the most popular animals only. And what if we actually found a video, but it was shot in some weird perspective? (If you're not interested in it, you can skip this theoretical intro and go right to the practical part.)
You need to complete two points to create an animation without relying totally on a video:
- Learn about the creature you want to draw. If you know how it's built and how it moves, you'll be able to create your very own run cycle without redrawing some video frame by frame. I've been building a base of animal tutorials that can be used for this purpose - check them out, maybe we have the animal you need!
- Find one or two photos of your animal running. Trying to find all of them would be pointless, since a run cycle is just it - a cycle of repeating phases. If a paw is raised, it will need to land in some point later, if it's standing, it's going to be raised, and so on.
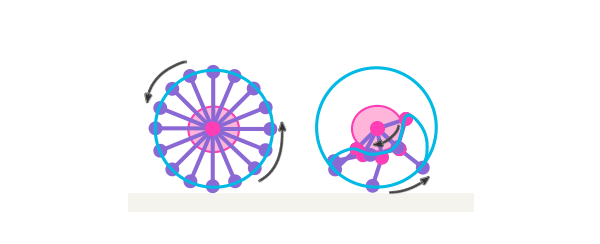
The second point needs a bit of explanation. Let's take a look at a run cycle's philosophy. A turning wheel is perfect for locomotion - it's turning all the time, without breaks, smoothly, taking the object with it. Animals don't have wheels, and if they wanted to use this method for moving, it would look like this:

Unfortunately (or fortunately, since it looks quite creepy), our joints don't work like this - they can't make a 360 degrees rotation. A leg can't just move forward all the time, at some point it needs to come back the same way to land in the push-spot again. This way the animal actually saves some time.

However, if legs were so long and stiff, they would actually create a back push when returning, making all this movement pointless. We need to add one more joint, so that legs could become shorter for a time of their return.

So, in other words, an animal moves its legs using a circular route, but when their joint reaches its limit, they take a shortcut.
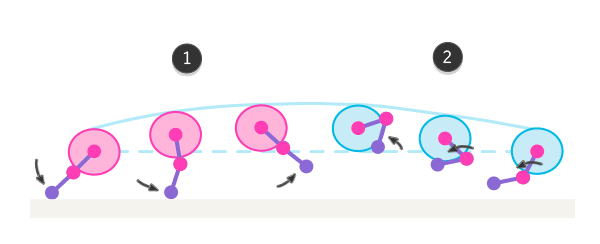
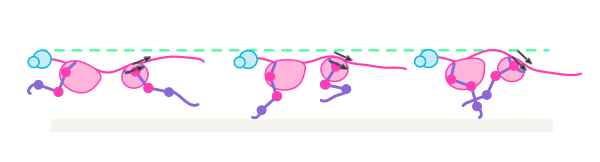
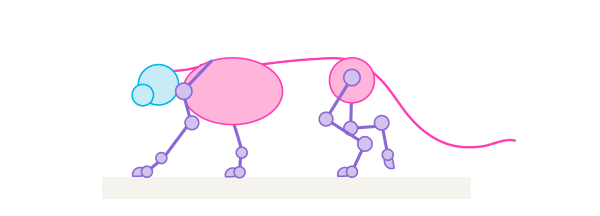
The most important lesson to take from this are the phases that such a movement is made of. We've got a push phase (1) and a pull phase (2). Running is all about pushing - when you jump, you push the ground away from you, leaving the hit spot - and your feet - behind you. The only way to hit a spot before you is to pull the feet to front again - and that's exactly how a run cycle works.
Another thing worth mentioning is lifting of the body. During the push phase it goes up (with the power of the jump), and then, during pull phase, it goes down to get some power again.
But since legs are attached to something, they're not the only thing that moves during the cycle. Chest and hips allow the rotation of the limb only to some extent, and in more extreme cases they need to rotate too to help it.
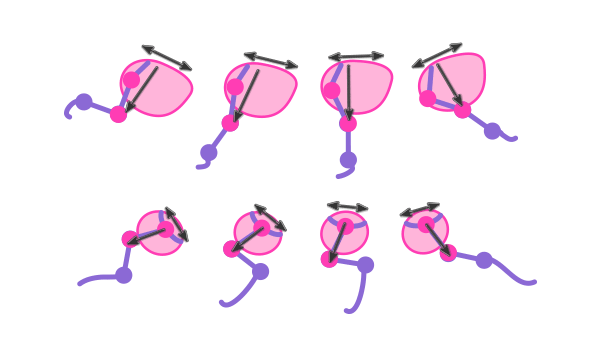
Limbs are attached to the chest and hips, and chest and hips are attached to the spine. The better runner the animal is, the more flexible the spine and the more extreme angles of stretched limbs.
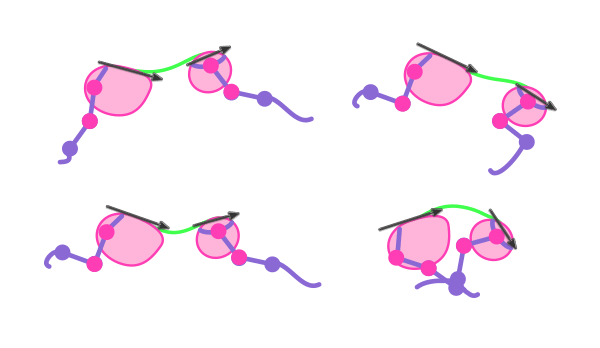
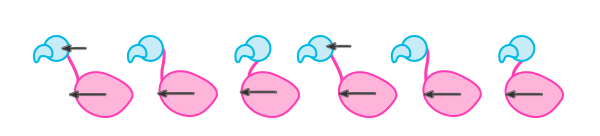
Image stabilization is crucial for a successful run, be it hunting or fleeing. A running animal tries to hold its head on an even level all the time - keeping it low when the chest is high and vice versa. The head doesn't retreat during run, but sometimes it may look like this when the shoulders are stretched out front, covering the neck. In birds the retreat-illusion is made by the body moving constantly and the head moving in cycles.
Perfect stabilization isn't possible, especially with a run made of big leaps, but try to keep it relatively steady - and never glue the head stiffly to the chest! When it comes to the tail, its position depends mostly on the angle of the hips.
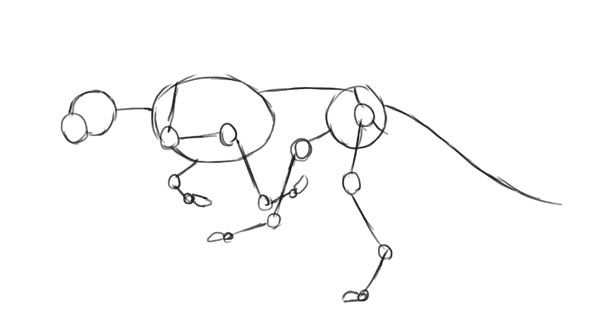
Once we've understood how it works, we can use any reference photo to start our run cycle. It's going to be our start pose, the one we need to determine the gait of the animal (how the legs move in relation to each other). It can be even as bad as this one:
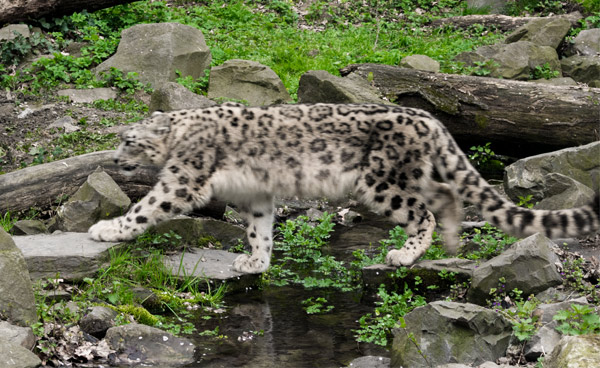
It's actually a walk cycle, which doesn't make any difference - there are still phases of push and pull, they are just slower and the angles of motion are gentler. So, first we need to find a pose hidden in the photo. You can sketch it with any tool you want, it doesn't need to be very clear.
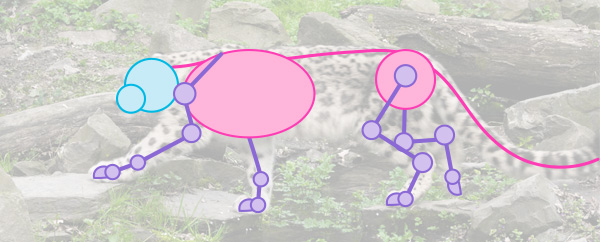
We need to adjust the pose to a flat ground. From now on, we don't need the reference anymore!
Time for analysis. Which phase is every leg in? In my case,
1 just finished its pull, 2and 3 are in the middle of push, and 4 just finishes it. It's very easy to foresee what happens in the next frame!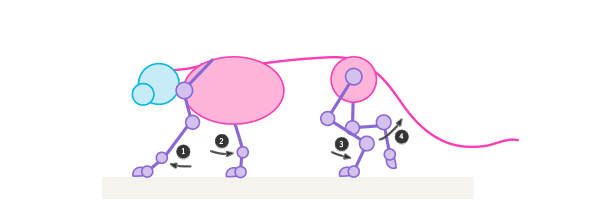
1 starts pushing, 2 and 3 finish it, and 4 is in the middle of pull. With this method you can create all the frames you need! 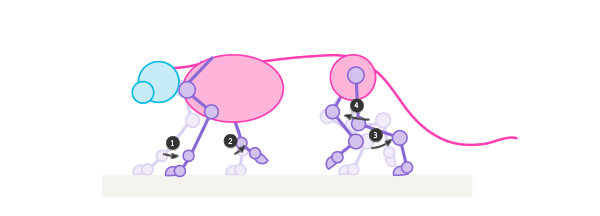
Everything's clear? If so, let's start our animation!
Step 1
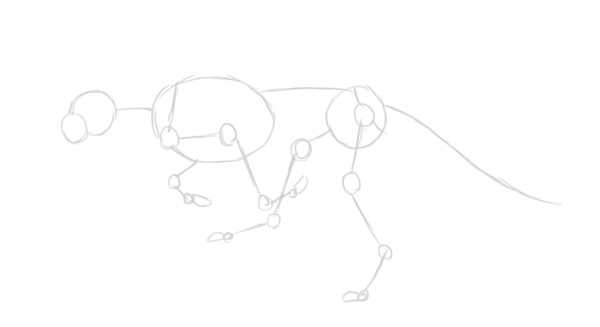
Using a reference picture, prepare a start pose. You can sketch it right on the photo, with any tool you wish - at this point neither it, nor the program you use for it is important. You may need a bit of anatomy knowledge here, but this article can also help you in most cases.
In fact, for the purpose of this tutorial, you don't need to search for any photo - I used a frame from my tutorial about cats, mixing it with a gallop of a horse (creating a rotary gallop - one with two suspension phases), and adjusted it all to a skeleton of a cheetah. In result I obtained a pose with one leg pushing and others pulling.
Step 2
It's the best to use Illustrator for this step, but if you can't, it's very easy to do it in Photoshop too (it's just a matter of convenience of using vector tools). I'll explain you the latter.
Create a New file (Control-N) and paste your start pose in there. Change its Opacityto 20% by hitting 2 on your keyboard with Move Tool (V) active.
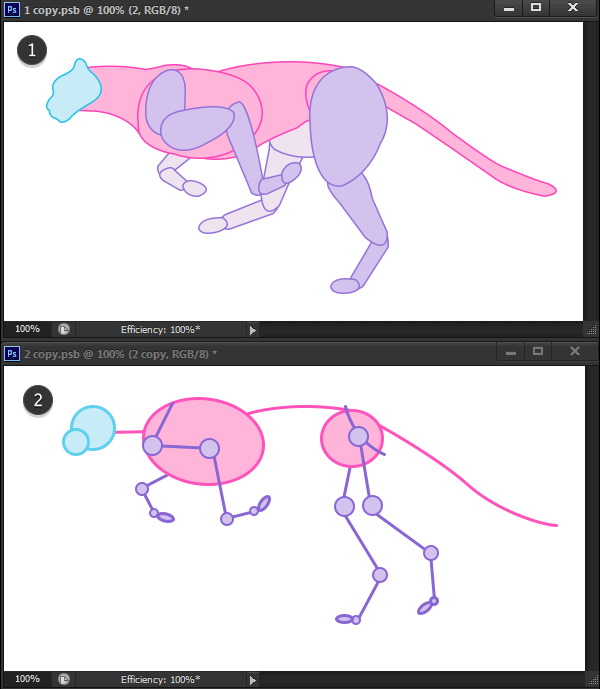
Step 3
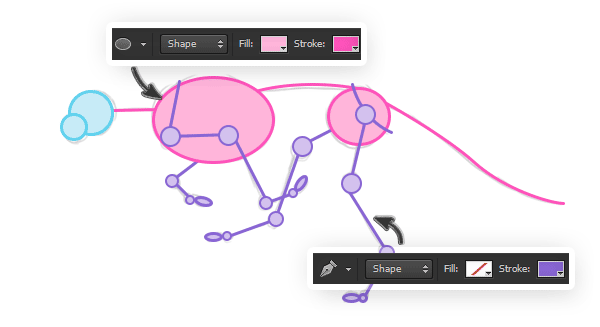
Draw over the sketch using vector shapes. Draw ovals with Ellipse Tool (U) and lines with Pen Tool (P). Colors aren't important, choose whatever fits you. Remember to draw whole limbs, no matter how big parts of them are visible in this position.
Why vector shapes? They don't lose quality when transformed (rotated or scaled), and they can be easily modified.
If you want to speed up the process, this model is available to download with other assets.
Step 4
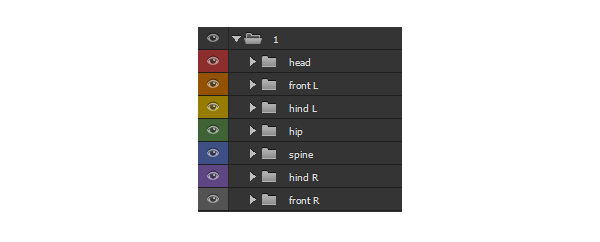
Group the shapes (Control-G) to have an easy access to every part. Then group all of them into a bigger group, the first frame.
Step 5
Duplicate (Control-J) the big group. This copy is going to be the second frame. Change the Opacity of first frame to 20%.

Step 6
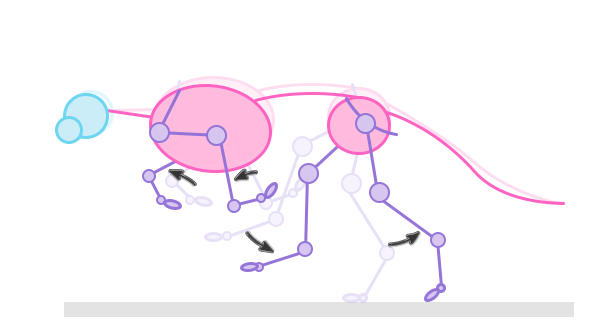
Modify the shapes of the second frame to create another phase of the movement. The smaller the changes between frames, the smoother and heavier the animation, and also the more work for you when it comes to painting.
Step 7
Hide the first frame and repeat the steps 5-7 until you close the cycle. When all the groups are revealed, it should look similar to this:

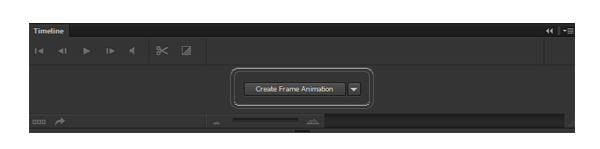
Step 8
Before we go any further, we need to test the animation. Go to Window > Timeline to open the animation editor, then click Create Frame Animation.
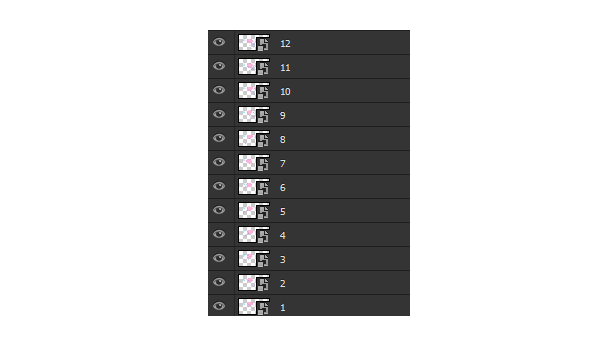
Step 9
Reveal every layer, select each individually (not all at the same time), right-click and select Convert to Smart Object. This way you'll be able to modify every group, but Photoshop will treat them as single layers. Your frames should now look like this:
Step 10
Open the menu of Timeline and select Make Frames From Layers (1). Set looping (2) to Forever and frame delay (3) to Other > 0.07. You may need to remove the frames made exclusively for the background (if you have any). Select all the frames and reveal the background for them.
Hit Space to test the animation. You may need to adjust frame delay to your own frames' number.

Step 11
Observe the animation attentively. Where does it lose smoothness? Why does it happen? Maybe somewhere a hip goes down suddenly when it should go up? When you're sure what the mistake is, double-click the layer - the smart object will open in a new window. Make the changes, save and come back to the animation. The changes will be applied automatically when you save.
Pay a special attention to this step - if something's wrong with the skeleton, even the neatest details won't save it. Take your time to fix every little mistake!
2. Body Definition and Musculature
Step 1
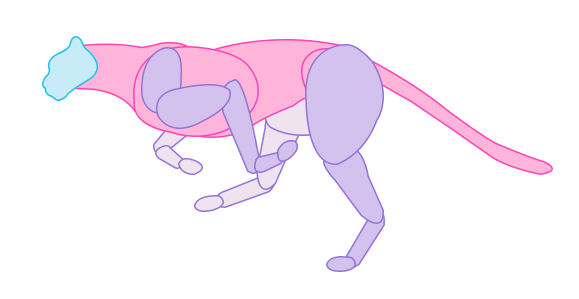
Time to add the body! To keep the consistency between frames we need to make it out of reusable chunks. Again, I suggest using Illustrator for this, but it's just the matter of convenience.
Open the first frame as a Smart Object and set its Opacity to 20%. Using simplified muscle scheme from my anatomy tutorial (simplified even more for this purpose) draw parts of the body on the skeleton. Use the Pen Tool (P) in Shape mode to keep it editable. Again, group and name local parts, keeping them all in one big group. Save the file and go back to the animation without closing it.
Step 2
Double-click another frame. Keep both files in individual windows by dragging them out of the bar. Once you can see them both, click the first frame, grab the group with body shapes and drag it into the second frame - this way you'll copy and paste the group inside. Hide the layer with skeleton in the first frame and close the file.
Step 3
Set the Opacity of the skeleton to 20% and transform the shapes of the copied group to fit the pose. Sometimes all you'll need to do will be simple rotation, but sometimes you'll need to modify a shape, especially the barrow that arches during the movement. Reusing the shapes building a pose lets you keep the body consistent during the movement - classic drawing over a frame can lead to a series of mistakes in untrained hands.
Repeat steps 2-3 until you've covered all the frames. Test the animation and fix any mistakes.

Step 4
Now we're going to break the animation for a while, but don't panic - everything's under control! Open the Timeline Menu and select Delete Animation. Time for something more spontaneous than careful building the body out of vector blocks.
First, resize the file (Control-Alt-I) to something as big as possible without choking your computer. For me, 7000 x 3500 is quite reasonable, but you may need to use something smaller. The bigger, the more details you'll have access to, but it may also slow down your animation. It has nothing to do with the final resolution of the animation - it's just our working size.
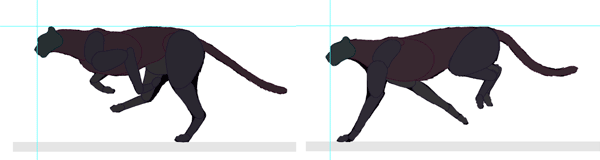
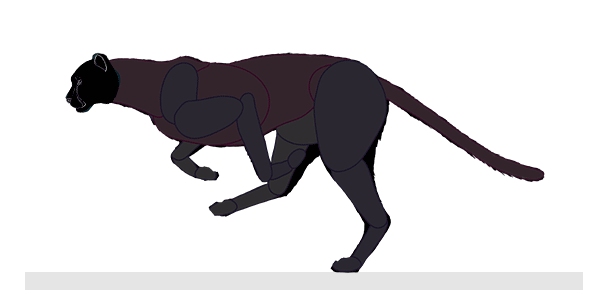
Step 5
Create a new Layer (Control-Shift-Alt-N) over the first frame. Use a hard brush (100%Opacity and Flow) to paint over the body. To make it easy, paint outline only and fill (G) the inside. Use the vector shapes as a guide, but also keep in mind features characteristic for a cheetah. Again, my tutorial about big cats comes to help. Don't pay special attention to head yet - just visibly mark its position.
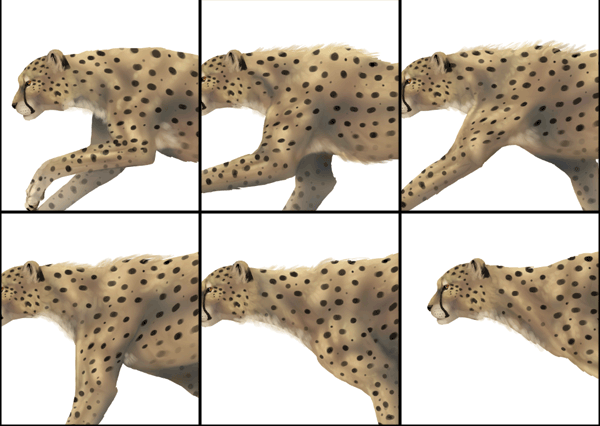
Repeat it for every frame. This time there's no tricks to accelerate the process - manual painting will give an individual character to every step of the movement. The only advice I can give you is not to paint frame by frame, but skip every other and come back to them later. This way if you get fatigued and the shapes you draw become careless, you'll achieve a decent mix of good and bad frames, instead of good frames gradually going bad.
If you want to test the animation at this point, save it as a new file, remove all the smart objects and create a new animation of the silhouettes.
Step 6
- Drag every silhouette under its guide shapes and set its Opacity to 20%;
- Select shapes layer and hit Control-Alt-G to create Clipping Mask and remove the bits crossing the outline;
- Select both layers (silhouette and its shapes) and hit Control-E to merge them. From now on you won't be able to modify the vector shapes anymore, so save the file under a new name if you want to keep them.


Step 7
Hit Control-R to show the rulers, then drag the Guides out of them to set the level of the head and back. This way you'll be able to see if a frame stays properly in relation to others. Use Arrow Keys with Move Tool (V) on to make small changes to the position.
Step 8
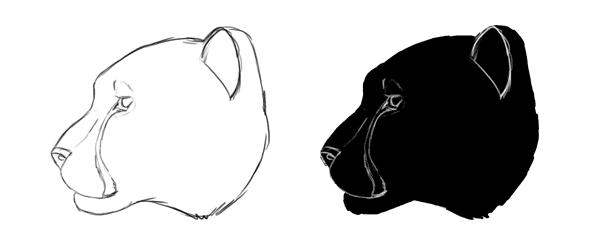
Until now, we were focused on the body only, without bothering about head. It's important to add a proper shape to it before we create the animation back.
Create a new file and use tips from big cat tutorial to sketch a head of the cheetah. Details aren't important yet, but the overall shape is crucial. Hit Control-I to invert the colors, so that you could draw a solid background for it. Save the file for later.
Step 9
Copy and paste the head into the main file. Convert it to Smart Object and transform it (Control-T) to fit the first frame. Then copy it and repeat this for every frame. Follow the position of the head we've set before! If you don't, the head will jump among the frames. Use Guides to avoid it.
Step 10
Use the Eraser Tool (E) to remove the remains of the head-template on the shape layer. You can also fix the transition between head and neck with the Brush Tool (B), the same we used to draw the silhouette. When you're done, merge every head with its body.
Let's create the animation back just like in Step 10 of the first part. Our cheetah is pretty much alive now, but there's still a lot of work to do!
Step 11
From now on, every new layer added would break the animation. To avoid it, we'll need to clip every of them to one of the silhouettes with Control-Alt-G.
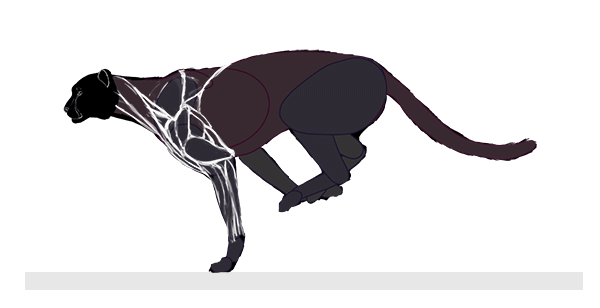
Let's use a muscle scheme from my big cat tutorial to draw muscles. We'll need to modify it to the shape of the cheetah's body, but it's a good reference anyway. The bigger problem is muscles aren't a rigid structure - they change during the movement, and it's not only about rotation, but about actual shape and proportion! Fortunately, there's a tool we're going to use quite extensively in this tutorial - Warp Mode or Free Transform Tool. While it will not save all of our problems, it's able to accelerate the process without sacrificing too much accuracy.
First, find a frame where a part of the body is the most similar to a stationary position, just like our muscle scheme. Create a new layer over it, clip it and draw the muscles. I used white to stress them, but it can be easily turned to black with Control-I.
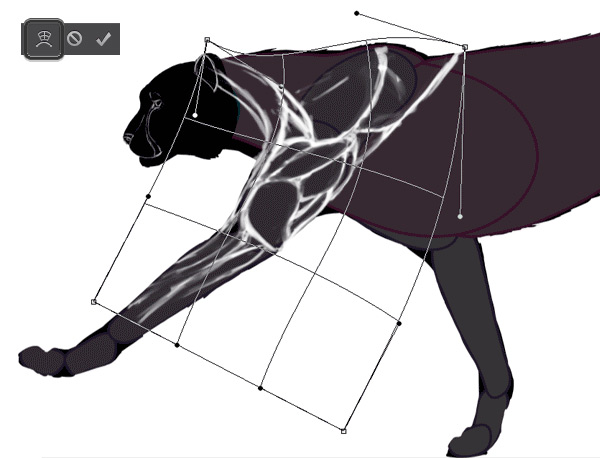
Step 12
Copy the drawing and paste it above another layer. Clip it and hit Control-T to open transform box. Now, click the Warp icon in the top bar. Use the mesh to adjust muscle drawing to this particular position. Sometimes you'll need to erase some part and draw it manually, but this method works for most cases. Just refrain from stretching the arm too much - it must follow the shape under it, it can't become bigger or smaller out of the blue.
Step 13
Repeat Step 12 for every frame. If you do this properly, the muscles should follow the movement smoothly. Don't bother about clean lines, this is just a sketch.
Step 14
Repeat Steps 11-13 for the hind leg and barrow too. When you're done, merge the muscle layers for every frame to save some space on Layer list. We're going to need it! Also, if you used white lines, invert them (Control-I) to get black ones. In the next steps we're going to get rid of the shape lines, so you may need to define some of them (overlapping of the legs and so on) on the muscle layer .
3. Shading
It's time for the most exciting part - we're going to bring the cheetah to life! Here andhere you can learn about the principles of shading. In this tutorial I'll just show you kind of shortcuts you can use to shade every frame very fast, when keeping all the animation consistent.
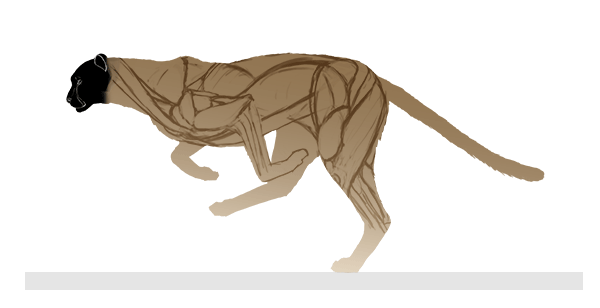
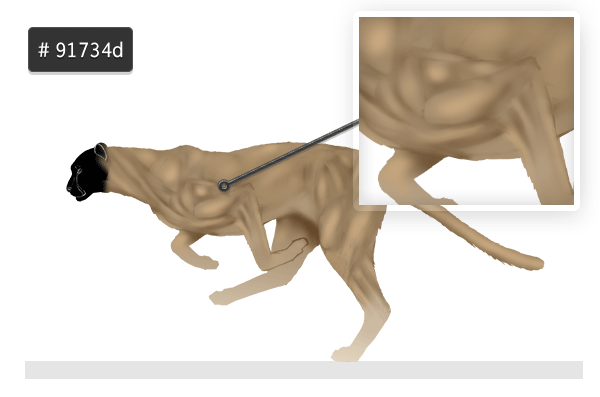
Step 1
Let's start with flat colors. Use a darker shade of the color you want - for me it's
#91734d. Leave the head as it is for now, we're going treat it as a detail. 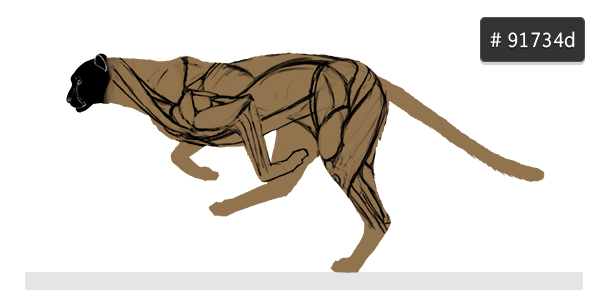
Step 2
It's common for cats to have lighter lower body. To save some time we can use a gradient to color it:
- Double-click on the color layer of the first frame;
- Select Gradient Overlay;
- Create a gradient of the base color with 0% Opacity and a lighter, less saturated version of it with 100% Opacity;
- Adjust the angle to the angle of the barrow.
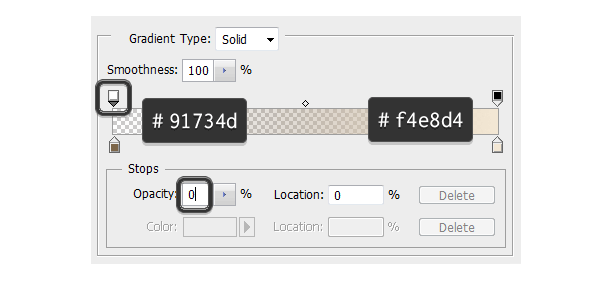
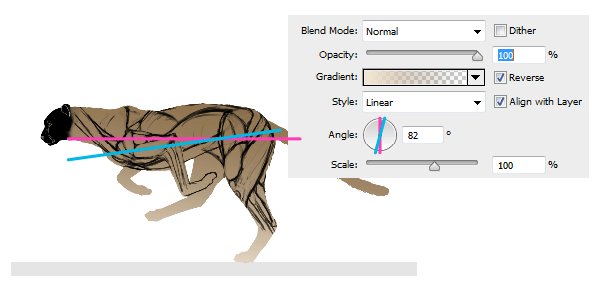
To accelerate the process, save the Layer Style and use it for every frame. All you'll need to do afterwards will be to adjust the angle of the gradient.

Step 3
Change the Blend Mode of every muscle layer to Soft Light. We don't want these lines to stand out.

Step 4
Now we're going into a more artistic phase. There's no tricks that could carry you through it without the necessity to spend some time on every individual frame. However, the strong, consistent base we've created should be more than enough to keep control over it.
There's one important thing about painting an animation frame by frame - it's the whole animation that matters, not a single frame. It's better to paint every frame loosely, but consistently, than to polish some of them, but each in different way. One frame doesn't matter - but they all do. It's because nobody will have a chance to stare at a single frame when they're all in motion.
Create a new layer (do I need to remind you about clipping?), grab a soft Brush and paint over the lines of muscles with a darker color (for me it's
#54371a). Don't bother about light direction at the moment.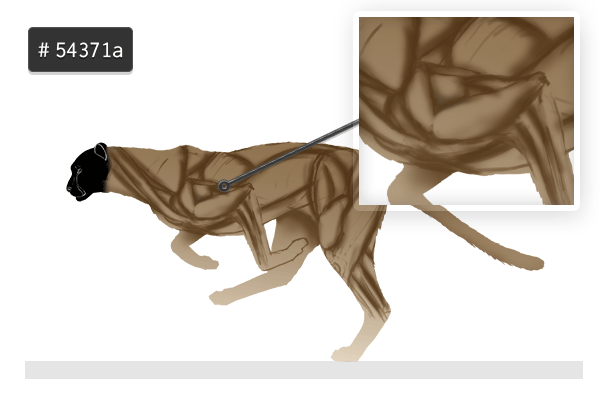
Step 5
Create a new layer and paint the center of every muscle with a brighter color (like
#c9a980).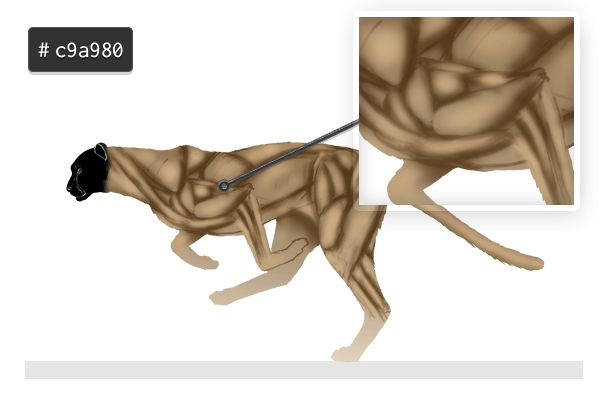
Step 6
Use the base color to blend the light and dark areas. The main goal of it is to conceal the contours, leaving only a suggestion of them under the skin. The prominence of the musculature is a matter of style, so you need to choose the degree of the blending on your own.
Step 7
Repeat Step 4-6 for every frame. Again, it's good to skip the frames to keep a consistent look no matter how bored you get. Also, it's better to do one step at a time for all the frames, to keep it fast. Don't pay too much attention to one single frame - only to all of them.
When you're done, test the animation. Check if something stands out, or if there's a some kind of blinking. When you're sure it's all right, merge all the shading layers for every frame - we don't want a mess.
Step 8
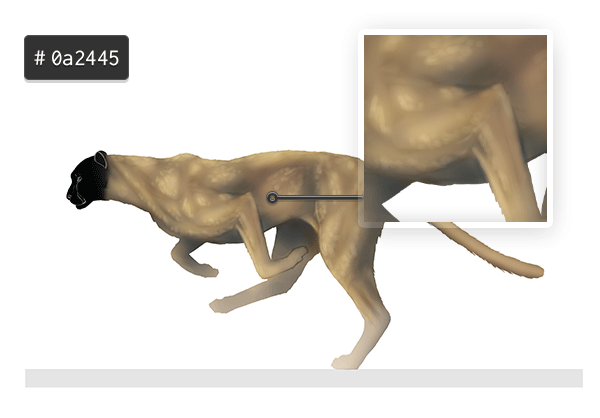
What we've just done wasn't shading in a strict sense - it's kind of ambient occlusion shading, without any directional light. Let's add lights to it - it's going to be a simple one, so that we don't have to fall from exhaustion over all these frames.
Let's start with shadows. I used dark blue (
#434748) and soft brush paint these areas, but the strokes were very subtle - this way, instead of painting the cheetah blue, I only gave a bluish shade to its fur. Notice how messy the shading is !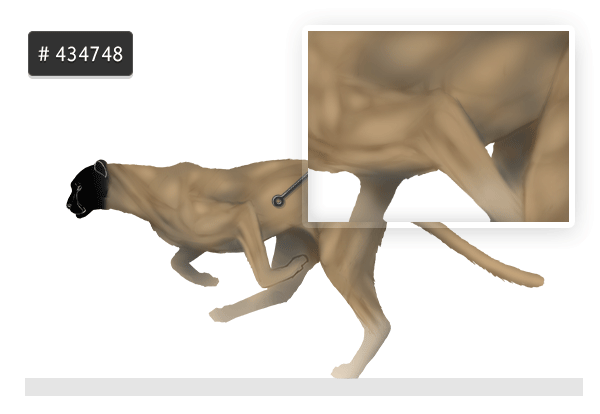
Step 9
Now, add an orange (
#f5d8a0) light on the opposite. Use Soft Light as a Blend Mode to brighten the area accordingly to the color under it.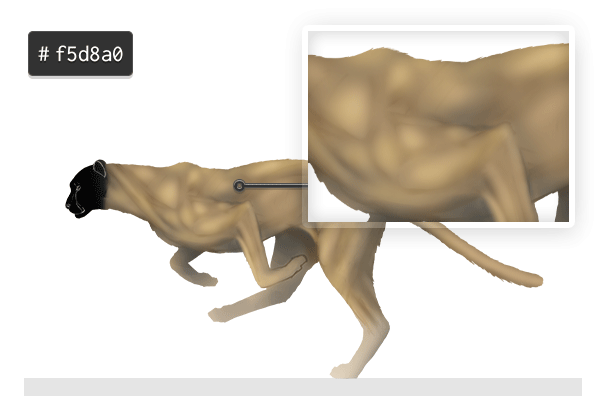
Step 10
For now the body of the cheetah looks very smooth, as if it was skin only, without any fur. It's because any texture, such as fur, disturbs the light on its surface. So that's what we need - a texture. And I'm not talking about some photo pasted with low opacity - texture is an area with disturbed light.
Create a new layer, change it's Blend Mode to Soft Light and draw single "strands of hair" (I used
#fff9ca for this).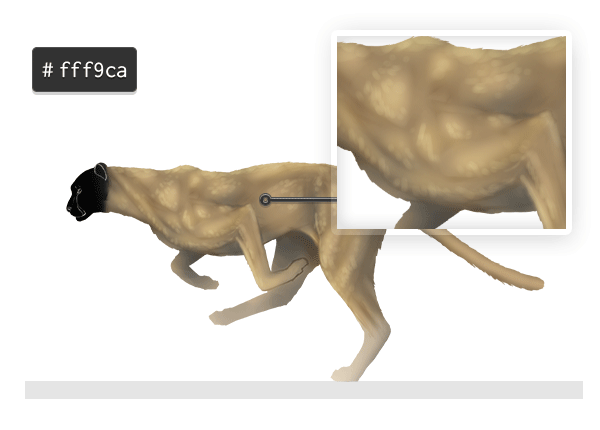
Step 11
To adjust the contrast a little bit, I created a new layer in Overlay mode and painted some more blue shadows.
Step 12
Test the animation. I like how it looks, but maybe you want to go for more fantasy look, with warm direct light and cold reflected light? No problem - take your time and polish the shading to your desire.
4. Add the Details
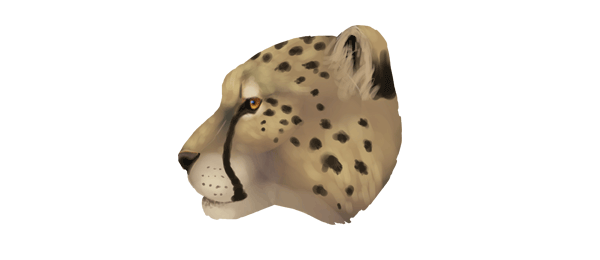
Step 1
It may be weird to treat the head as a detail, but since it's very detailed itself, we need to take special care of it.
Open the file with black head and pain the details now. They don't have to be very neat, especially if you're going for a small animation.
Step 2
Copy and paste the head into the first frame. Before doing anything, convert it to Smart Object to restrain the quality loss during transformations.
Scale and rotate the head to fit exactly with the black template we've attached before. You may need to paint over some fur to conceal the "seam" between it and the neck.

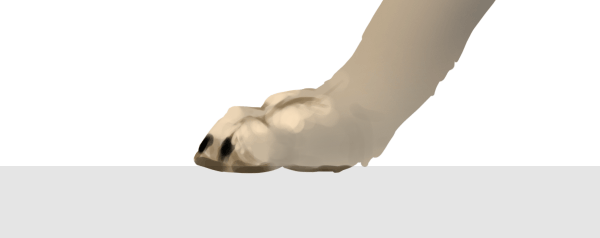
Step 3
To add the paws, find a frame where one of the stays in a "default" position. Paint the details on a new layer and convert it to Smart Object.
Step 4
Just like with muscles, copy and paste the layer to all the frames, adjusting the shape to every paw. Sometimes you may need to change the Opacity of a paw to fit the shading. By the way, shade the legs if needed.
Step 5
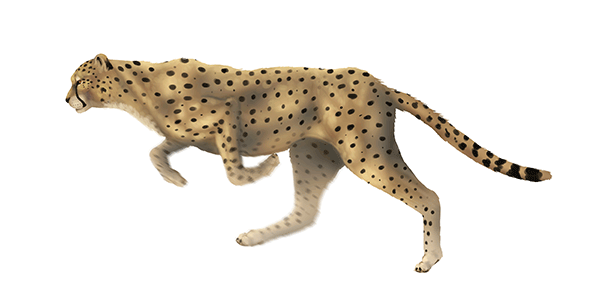
It's high time for spots! Just like with muscles, we need to find a default position for every limb, barrow and tail. Paint the spots on it, convert it to the Smart Object, copy it to a next frame and warp the shape. The Smart Object will remember the warping among the frames. Take good care of single spot's shape - they shouldn't get too distorted. Also, keep in mind you'll need to rasterize the object to erase overlapped bits.

Step 6
Now, when you're sure the animation is complete, we need to get rid of the mess. Select all the clipped layers of every frame (without the actual clipping mask) andmerge them. Then Select the merged layer, right-click and select Merge Down. This way you'll merge the layers without breaking the animation.
There are three things you can do now to add a final polish to the animation. First, you can use Adjustments (select it on Window list to find the options). The options you may be interested in the most are Color Balance, Hue/Saturation, Brightness/Contrast, but feel free to experiment with others too.

The other way is Liquify filter (Shift-Control-X) and its Forward Warp Tool. With it you can slightly move some part of the body, for example close the eye of the cheetah when it's hitting the ground after big leap, or move its ears during the run (or, in my case, change the head's size that still didn't look OK). The third way is to actually paint something on the frame, like waving fur. These small changes can give more life to the animal, taking away the stiffness made by a bit automatic process of animation. They work the best when they're gradual - starting slightly on one frame, with strong effect on another frame and weakening on the next one.
Step 7
Another trick for a run cycle is a blur added on some of the parts. To do this, you can select a limb with Quick Mask (Q) (just paint over the area with a soft brush, click Q again and Control-Shift-I to invert the selection). Then use Filter > Blur > Motion Blurwith the angle of movement.
Step 8
Finally, we need to save the animation as it will be presented to our viewers. First, change Image Size (Control-Alt-I) to the dimensions you need - the smaller, the lighter the file. When you're creating for Web, it's the best to keep the size under 200KB, that's not always easy with a painted animation like this. You may need to decide if you go for resolution...
...or maybe the overall quality and lack of noise.
To save the animation, click Control-Shift-Alt-S. You can experiment with these options to find the best result, but I can give you some hints:
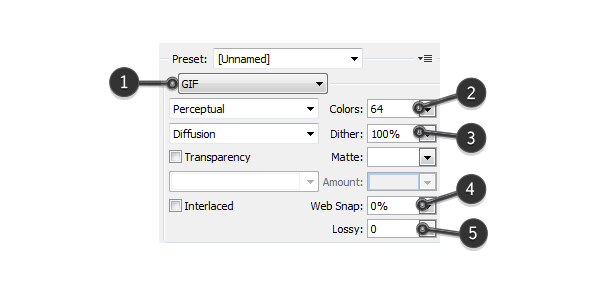
- Of course, you need to select GIF as a format to create an animation for Web;
- The amount of colors should be your first choice. Start with 256 and see if the size (left lower corner) is close to the one you need. If 32 colors give you the perfect size, go for 64 and try to play with the sliders;
- Dither should be your first choice for optimization. Even sliding it down to 0 doesn't make so much difference in quality, but the size will drop anyway;
- This should be your last, desperate choice. You can go quite safely up to 50%, but it's very easy to lose the very foundations of quality here;
- This slider doesn't only give you savings in size, it's also able to add a nice effect to your animation. However, don't go too high!
Make sure to check Preview just under the size - some browsers accelerate the speed of animation, so you may need to adjust it once again.
We're Done!
After this long, thorough tutorial you should be able to create a beautiful run cycle for any animal. While a smooth, precise animation takes a lot of time, this method of doing it guarantees you great results - unlike painting-frame-by-frame, where everything is a guessing game. I hope you had fun following the steps and that you learned a lot for your future projects!


WoW. this is just spooky amazing. please put out more tutorials on thuis type of animation
ReplyDeleteComputer Tips And Tricks: Create A Run Cycle Animation From Scratch In Adobe Photoshop >>>>> Download Now
ReplyDelete>>>>> Download Full
Computer Tips And Tricks: Create A Run Cycle Animation From Scratch In Adobe Photoshop >>>>> Download LINK
>>>>> Download Now
Computer Tips And Tricks: Create A Run Cycle Animation From Scratch In Adobe Photoshop >>>>> Download Full
>>>>> Download LINK