Create A Facebook Fanpage And Promote Your Blog

0 comments


Facebook Fanpage

1. Log in to your facebook account and head to this page.
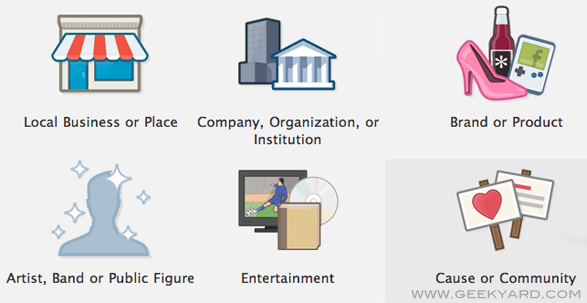
2. Depending upon your blog niche select a page category. Here I am creating Fanpage forChennaifind.com blog. So, I selected cause or community category.
Fanpage with different categories
3. Enter Your site name e.g Chennaifind and click I Agree to the terms to continue.
Create a Fanpage
4. The next page takes you to where you’re asked to upload the page’s profile picture. You can use yourblog’s logo.
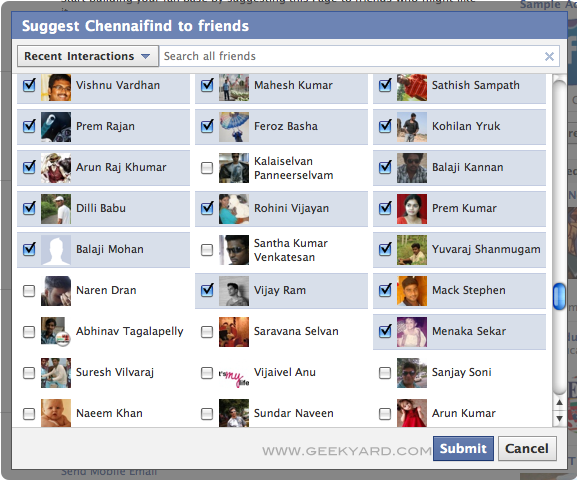
5. Now invite your facebook friends to like your fan page or import email contacts to notify about your new fan page as show below,
Suggest Chennaifind to Friends in Facebook Fanpage
6. Enter the basic info about your blog or website on the next page.

Read More »

Block Annoying People On Facebook

0 comments

1. Log In to your Facebook Account
2. Go to the person’s profile that is annoying you.
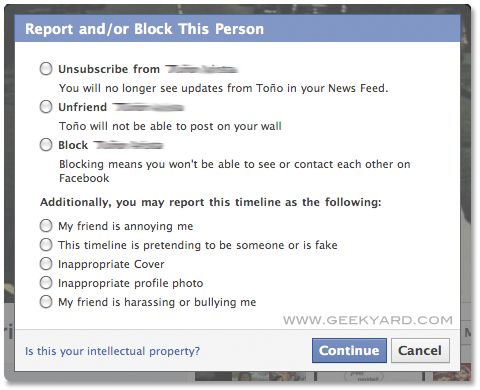
3. Find a link that says “Report/Block this person” and click it.
Report and blok a person in Facebook
4. Click on “Block this person” checkbox and submit it is done.
This will disable him to post any link on your profile or anything, in fact he won’t be able to find you as well in any case. He won’t be able to see it through his friends or from the Facebook search.
Steps to Block or Unblock People on Facebook
Their is a second method to block a person. Well by this method you can even unblock blocked persons also.
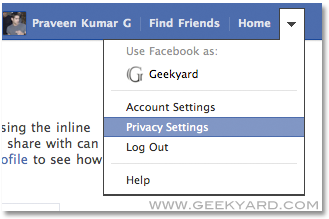
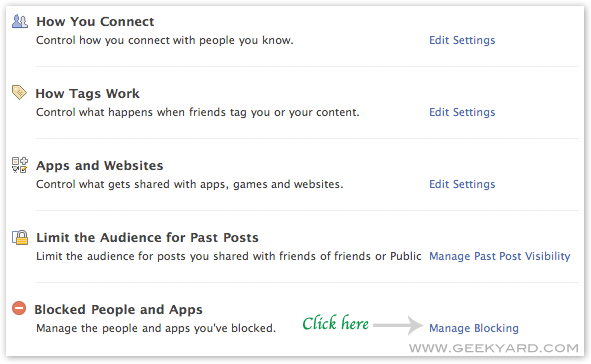
1. Open your Facebook Profile and in the upper right section click on Account –> Privacy Settings.
Facebook Privacy Settings
2. Once your privacy setting are open, click on “Blocked People and Apps”.
Facebook Blocked People and Apps
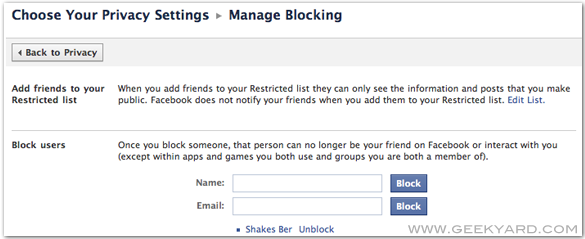
3. From the open page you can also add people to block list and remove people from list which are already been blocked.
Block or Unblock users in Facebook
Stay protected on Social networks that’s highly important :)


Read More »

Easily Repair & Fix Windows 7 & Vista Problems With FixWin Utility

0 comments

Easily Repair & Fix Windows 7 & Vista problems with FixWin Utility
Some of the problems & fix solution provided by “Fixwin Utility”
  1. Recycle bin icon missing from desktop
  2. Reset or fixes folder view settings to default, when folders are showing different command bar and controls than content.
  3. Games Explorer is not working or unable to open Games Explorer folder.
  4. Enables folder option.(Click here for solution)
  5. Fixes show hidden files,folders & drives.
  6. Restore the windows sidebar.
  7. Fixes Recycle Bin icon, when it doesn’t refresh automatically.
  8. Explorer.exe won’t start at boot in windows.
  9. CD drive or DVD drive is missing or is not recognized by windows or other programs.
  10. Thumbnails not working in windows explorer.
The solutions to repair and fix 50 common Windows annoyances, issues & problems have been categorized under 5 tabs,
  • Windows Explorer,
  • Internet & Connectivity,
  • Windows Media,
  • System Tools &
  • Misc Additional Fixes.

Read More »

Clean Your RAM Using Notepad

0 comments

Cleaning your RAM using notepad
Step 1: Open Notepad
Step 2: Type FreeMem=Space(10240000000)
Step 3: Save it as “CLEANER.VBS” in any location you like.
Step 4: You can edit the code and write 512 instead of 1024 if you own a 512mb RAM or change to anything you like.
Step 5: Run it !
After this final step your RAM will be free.
Hope you enjoyed it. :)

Read More »

Download Alienware Icon Pack Set For Free

0 comments

Read More »

Change Windows 7 Logon Screen Using Registry

0 comments

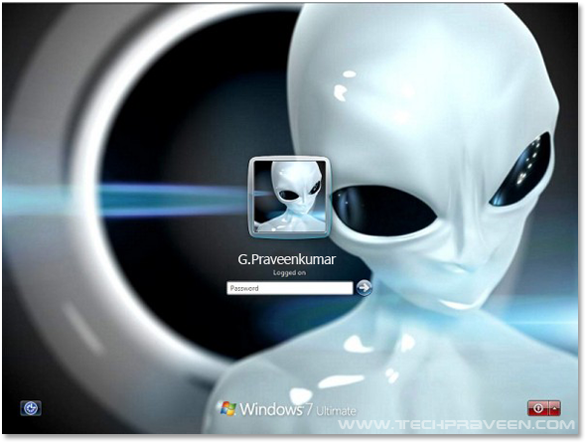
Alienware Windows 7 Logon Screen

Steps to Change Windows 7 Logon Screen

1. Press Windows Key + R to launch Run. Type REGEDIT and hit enter.
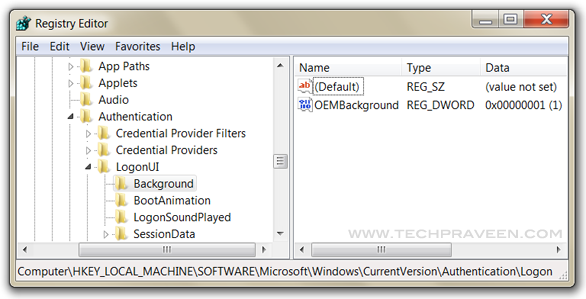
2. Now navigate to,
HKEY_LOCAL_MACHINE\SOFTWARE\Microsoft\Windows\CurrentVersion\Authentication\LogonUI\Background
Change value of OEMBackground to 1.
Customize Windows 7 Logon Screen using Registry
or
Alternatively you can download the Registry file from here.Extract the file and double-click on the file to enable this feature (Alternative method: right-click, select Merge).
4. Now navigate to C:\Windows\System32\oobe, create folder “info”, double click it and create another new folder “backgrounds”.
5. Now place your desired picture inside logon file into C:\Windows\System32\oobe\info\backgrounds. In my Windows 7 I use Alienware themes so changed Windows 7 Logon Screen with Alienware picture.
Windows 7 Logon Screen Background Image
6. Rename the file to backgrounddefault.jpg. (Please NOTE: Images must be less than 256kb in size).
7. Press Windows Key + L to view your customized Logon Screen. Else Reboot your Windows 7 to applychanges.

Read More »

Internet Download Manager Full Activation

0 comments


Internet download manager  is a tool to increase download speed of your files like videos ,mp3 music files or any other files.In this post we are going to explain you about how to do activation of IDM crack tool for life time with out any serial Key and Patches.We  introduced this because many of the patches don't work they may create viruses when you install it into your the personal Computer. So try this tool for faster and safer downloads.This is 100% working trick, go ahead with the simple steps below in this tutorial.


Features of this download Manager:
STEP 1:-
Install any old or current version of IDM.
Download IDM New Version click the below link :-
 Internet Download Manager  

STEP 2:-
Then open  the "IDM crack for life.exe" file .
Download IDM crack for life.exe by the below link


Download Link :- "IDM crack file for life.exe".


STEP 3:-
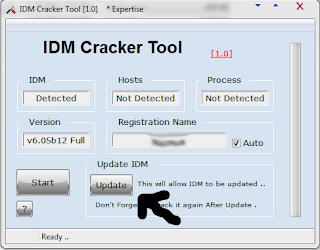
Click on the Update Option as shown in the Image Below.

Idm With Crack
 STEP 3:-
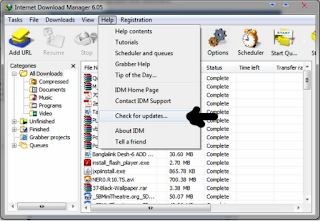
 Go to IDM > Help > Check for Update & update the software.


Idm With Crack


STEP 4:-  
Open IDM crack for life.exe again and click "Start" to make the new updated IDM full version as shown in the Image below.


STEP 5:- 
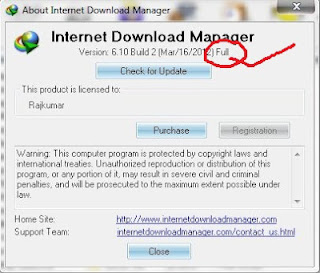
After completing all steps click the Help option and in that
click the About IDM option.Now it is activated as full version.Image is shown below.

Idm With Crack


                      Enjoy And Wait For Next

Read More »

बिना इन्टरनेट कम्प्युटरबाट सिधै नेपाली अक्षर

0 comments

आज मैले केवल तपाइंको लागी एउटा सजिलोसंग नेपालीमा लेख्न मिल्ने  सफ्टवेर लिएर आएको छु अबश्य प्रयोग गरेर हेर्नुहोला यो सफ्टवेर प्रयोग गरिसकेपछी फेसबुक अनि याहू जस्ता हरेक साइटहरुमा सिधै च्याट गर्न सकिने अनि आफ्नो कम्प्युटरमा पनि लेख्न सकिने
अब नगरौं झन्झट unicode रोमनबाट नेपालीमा लेख्नको लागी साइटहरु खोज्न यो सफ्टवेर प्रयोग गरेर बिना internet कुनै पनि बेला लेख्न सकिने शुरु गरौँ कसरी बनाउने नेपालीमा लेख्नको लागी तल हेरौं
१. सबैभन्दा पहिला तपाइं यो लिंकमा गएर भाषा चयन गर्नुस मतलब त्यहाँ Nepali लेखेको कोठाभित्र Mark लगाउनुस र अब तल "I agree the google tearms of service and privacy policy" मा Tick लागाएर डाउनलोड गर्नुहोस

२. डाउनलोड successfull भैसकेपछी कम्प्युटरमा गएर त्यो सफ्टवेर लाई अनिबार्य scan गरौँ र त्यो सफ्टवेरलाई अब right click गरि "Run as administrator" मा क्लिक गरौँ

३. अब केहि समय पर्खिनुहोला उदाहरणको लागी तलको चित्र हेरौं

४. अब केहि समय पछी नया pop up फाइल खोलिनेछ र त्यहाँ तल हेरौं जस्तै "I accept the term of use in 'End User License Agriment' (A)" मा ठिक लगाइदिउ अनि (next) बटनमा थिच्नुहोस

५. अब केहि समय पर्खौं अनि तल (finish) बटन दबाउँ

६. तपाइंको कम्प्युटरमा  नेपाली भाषा त successful भयो तर अब लेखनलाई सजिलोको लागी "Shortcut keyboard key" बनाउन जरुरी छ त्यसैले तलको नियम पालन गर्न आग्रह गर्दछु
७. सबैभन्दा पहिला "Control Panel"हुँदै "Region and langues"  मा क्लिक गर्नुहोस र "Keyboards and languages" मा क्लिक गरी "Change keyboards..." मा (click) गर्नुहोला
८. अब "Advanced key Settings..."  मा क्लिक गर्नुहोस र तल पुछारमा हेर्नुहोस "Change key sequence..." मा क्लिक गरि नया pop up window खोल्नुहोस

९. अब त्यहाँ खुलेको window मा केहि "Shortcut key"  हरु दिएको छ तपाईं लाई सजिलोको लागी दुइ ओटा मतलब दायाँ र बायाँ shortcut key मा ठिक लगाएर तल ok बटनमा थिच्नुहोस अनि सबै windows files close  गर्नुहोस

१० अब चाही तपाइंले नेपालीमा लेख्नको लागी "Google nepali input"  तयार भयो र लेख्ने तरिका तल हेर्नुहोस

११. Now you are absolutely successfull for downloading and settings google nepali input writing language
यदी तपाईं अंग्रेजी रोमन बाट नेपाली Unicode मा अनलाइन मार्फत लेखना चाहनुहुन्छ भने यहाँThank you.


Read More »

Some Facebook Chat Image Code

0 comments

[[facebook]] - facebook
[[msn]] - msn
[[yahoo]] - yahoo
[[skypee]] - skypee
[[youtube]] - youtube
[[google]] - google
[[mac]] - mac
[[329135820464185]] – angel
[[329135840464183]] – angry
[[329135853797515]] – bad
[[329135873797513]] – beer
[[329135897130844]] – bowl
[[329135923797508]] – boy
[[329135930464174]] – brb
[[329135960464171]] – cake[[329135987130835]] – camera
[[329136013797499]] – car
[[329136037130830]] – cat
[[329136063797494]] – cigarette
[[329136083797492]] – clock
[[329136127130821]] – coffee
[[329136157130818]] – coins
[[329136210464146]] – computer
[[329136230464144]] – confused
[[329136240464143]] – console
[[329136250464142]] – crying
[[329136277130806]] – devil
[[329136300464137]] – dog
[[329136323797468]] – don't know
[[329136337130800]] – drink
[[329136357130798]] – embarrassed
[[329136390464128]] – eyeroll
[[329136413797459]] – film
[[329136433797457]] – fingers crossed
[[329136443797456]] – foot in mouth
[[329136463797454]] – girl
[[329136487130785]] – glasses cool
[[329136510464116]] – glasses nerdy
[[329136533797447]] – good
[[329136563797444]] – handcuffs
[[329136593797441]] – high five
[[329136610464106]] – hug left
[[329136627130771]] – hug right
[[329136633797437]] – island
[[329136640464103]] – kiss
[[329136647130769]] – lamp
[[329136663797434]] – laugh
[[329136680464099]] – love
[[329136690464098]] - love over
[[329136700464097]] – mail
[[329136747130759]] – moon
[[329136783797422]] - musical note
[[329136790464088]] – neutral
[[329136817130752]] – party
[[329136847130749]] – phone
[[329136873797413]] – pizza
[[329136893797411]] – plate
[[329136917130742]] – present
thank u :)

Read More »

Light effects

0 comments

 Step 1

Open Photoshop and create a new document, after that make sure that the background is in black.
Classic Light Effect in Photoshop

Step 2

To make the effect more realistic let's use a stock photo, the one I am using is courtesy from Shutterstock and you can find it at http://www.shutterstock.com/pic-24939406/stock-photo-glowing-lamp-on-bla.... Place the image in the center of the document but make sure that the filament area is big engouh.
Classic Light Effect in Photoshop

Step 3

Go to Layer>Layer Mask>Reveal All. Then with the Brush Tool (B) select a very soft brush (0% hardness0 and black for the color. Start paiting the areas of the light you want to hide. Use the image below for reference.
Classic Light Effect in Photoshop

Step 4

Now let's delete the filament area where we will add the text with the light effect later on. To do that is pretty easy, with the Eyedropper Tool (I) select the color of the area you will paint, the with the Brush Tool (B) and a very soft brush, start paiting over the filament. Note: I added a new layer instead of painting over. Another tip is if you are using the Brush Tool (B) you can just press Alt to use the Eyedropper Tool.
Classic Light Effect in Photoshop

Step 5

With the Horizontal Type Tool (T) add the word light in white. I am using Exmouth for the font, you can download it here http://www.dafont.com/exmouth.font. For the size I am using 82 pixels but the size will depend on your document size. After that add a new folder in the Layers Palette and change the Blend Mode of this folder to Color Dodge. Move the light text into the folder you have just created.
Classic Light Effect in Photoshop

Step 6

With the text selected go to Filter>Blur>Gaussian Blur. Use 4 pixels for the Radius.
Classic Light Effect in Photoshop

Step 7

Because the white text is inside the folder with the Color Dodge, the effect will be the same as if the text layer had a black background. You can see that the edges get sort of blended with the background creating a perfect light effect.
Classic Light Effect in Photoshop

Step 8

Again to add more realism, instead of creating a lens flare in Photoshop we will use a real photo. The one I am using I found in Google Images and you can find it here http://web.williams.edu/astronomy/IAU_eclipses/jmp_eclipse03_04.jpg.
Once you imported the photo the first thing to do is delete the areas that you won't be necessary and keep just the flare. After that go to Image>Adjustments>Desaturate.
Classic Light Effect in Photoshop

Step 9

With the flare layer already desaturated, just change its Blend Mode to Screen. Screen is a very useful Blend Mode because it turns what is black into full trasparency the grey scale becomes a transparency level, so it's perfect to create light effects.
Classic Light Effect in Photoshop

Step 10

Add a new layer and go to Filter>Render>Clouds. Make sure you had black and white for the background and foreground colors. This layer also will be on top of the others.
Classic Light Effect in Photoshop

Step 11

Change the clouds' layer Blend Mode to Color Dodge. After that add a new folder in the Layers Panel and move the clouds layer into it. After that change this folder's Blend Mode to Overlay.
Classic Light Effect in Photoshop

Step 12

Add a new layer inside the folder in which you moved the clouds' layer. Make sure that the new layer is beneath the clouds' layer. After that with the Brush Tool (B) and a very soft brush with #f5d38b paint a round spot in the center of the light effect. Change this layer's Blend Mode to Overlay too.
Classic Light Effect in Photoshop

Step 13

Now add another layer on top of all the others and then with the Brush Tool (B) and a big and very soft brush using white for the color, paint another big spot in the center of the light effect. After that go to Layer>Layers Styles>Color Overlay. Use #ffd648 and Linear Burn. The idea is to make the light a bit stronger.
After this we are done and as you could see, most of the light effects are all about blending colors with photos. The Blend Modes in Photoshop are very powerful for this type of effect and I would recommend you to study more about them, especially the Color Dodge one.
Classic Light Effect in Photoshop


Read More »